26 KiB
| layout | title | author | tags | team | ||||
|---|---|---|---|---|---|---|---|---|
| post | Dependency injection tutorial with Weaver on iOS (part 1) | theo |
|
iOS |
In this tutorial you’re going to explore how Dependency Injection (DI) and DI Containers can be used to develop robust iOS applications. To do so, I’ll explain step by step how Weaver’s sample application was written and why.
**Dependency Injection (DI) basically means “giving an object its instance variables”* ¹.*
It’s a way to organize the code, so that the logic of an object can delegate part of its work to other objects (dependencies) without being responsible for their instantiation. For that reason, dependencies can also be injected as abstract objects (protocols). It turns out that this loose coupling between objects makes the code more modular and flexible, and thus, a lot easier to unit test.
While DI can be implemented manually, object initializers can easily become very complex, encouraging developers to use anti-patterns like singletons. That’s where Weaver can help, by generating the necessary boilerplate code to inject dependencies into Swift types and ensure a clean dependency graph.
At the end of this tutorial, you’ll get the following application up and running.
 Weaver’s Sample App Demo
1. Under the hood
Before jumping into the code, let’s see what Weaver does under the hood:
- Scans the Swift code for annotations.
- Assembles the collected annotations to create a dependency graph.
- Validates the graph, looking for potential dependency cycles and unresolvable dependencies.
- Generates the boilerplate code.
Note that all these steps happen at compile time, thus, if any of them fail, it would stop the project’s compilation.
2. Installation
The easiest way to install Weaver is with Homebrew.
If you don’t have it installed on your machine, run the following command:
$ /usr/bin/ruby -e “$(curl -fsSL https://raw.githubusercontent.com/Homebrew/install/master/install)"
Then install Weaver like so:
$ brew install weaver
If you don’t want to use Homebrew, you can also install Weaver manually as explained in the readme of the project.
3. Getting started
First of all, let’s create a project called Sample.
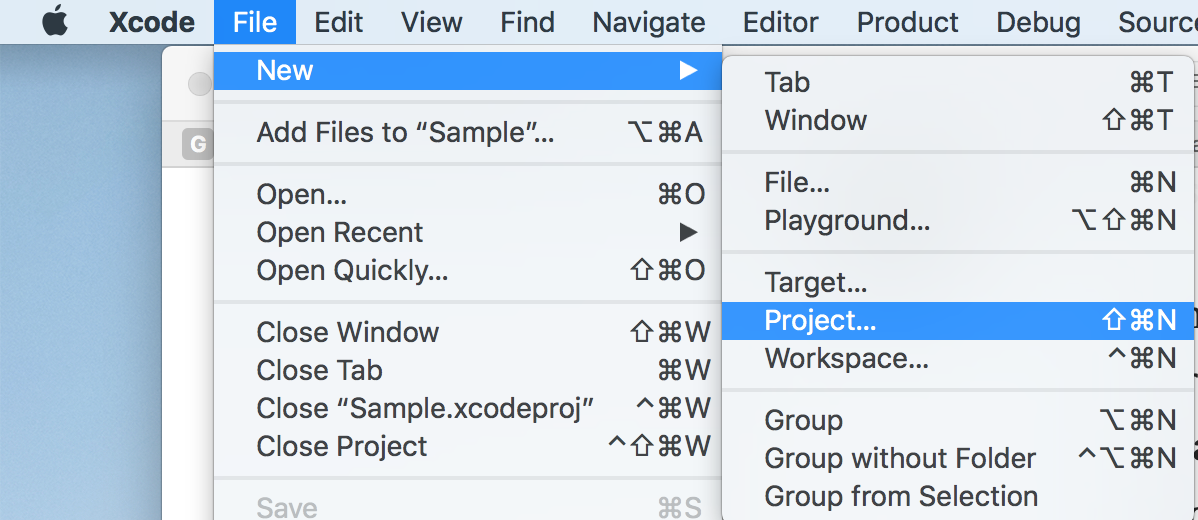 Xcode -> File -> New -> Project
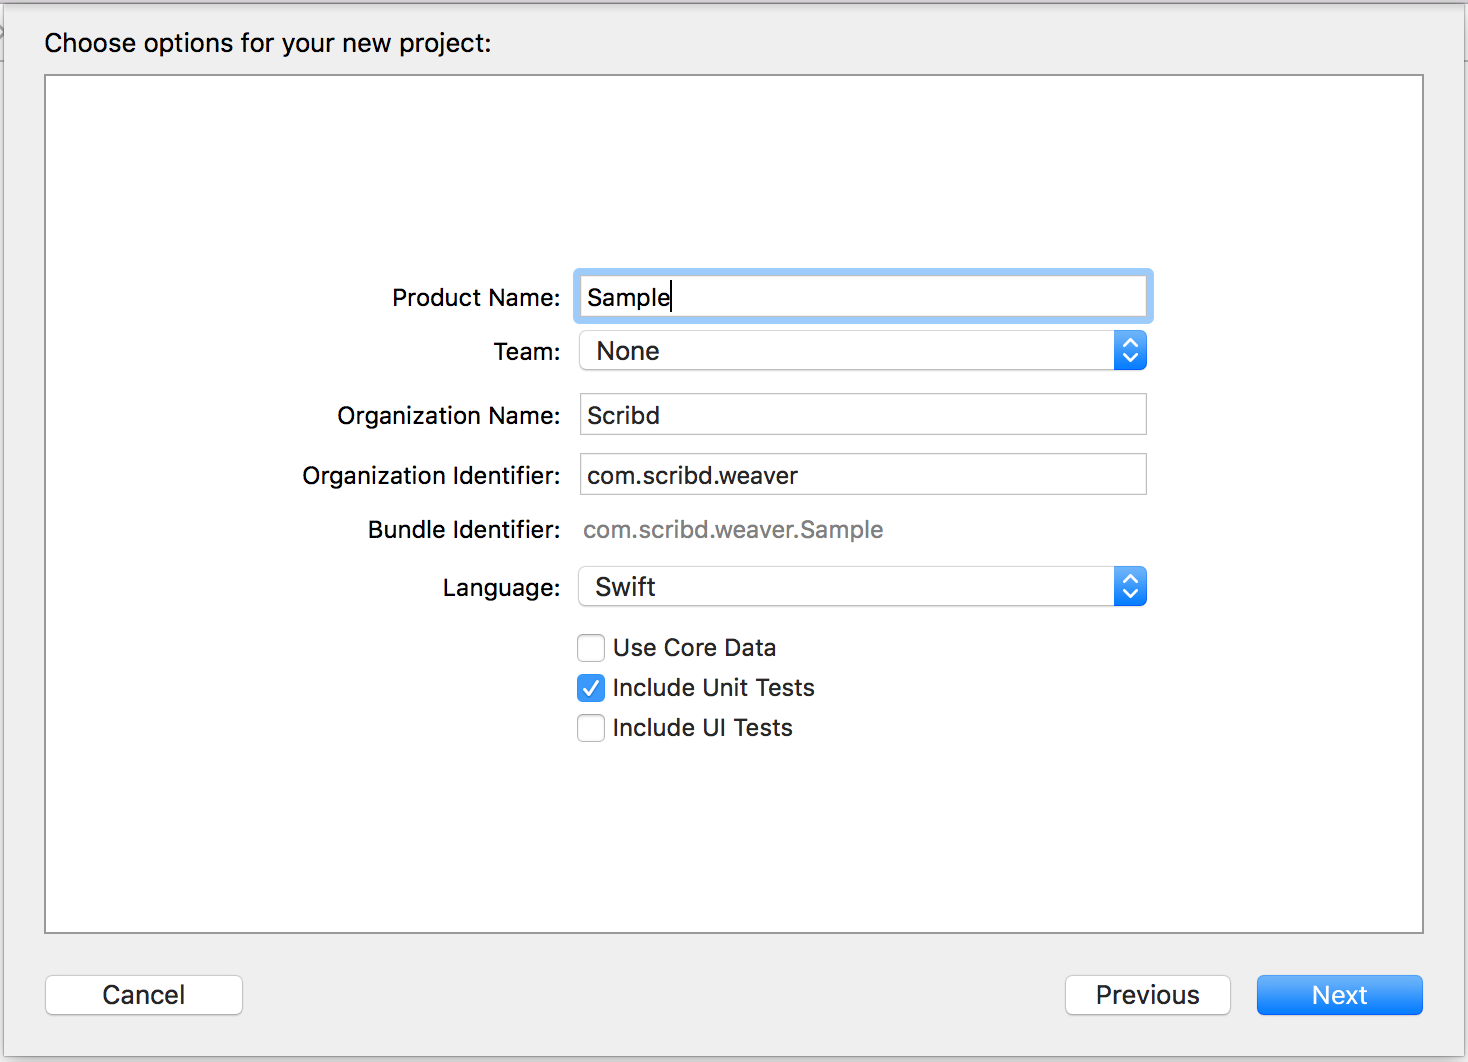 Xcode project creation window
Create the directory Generatedat the root of the project. That’s where Weaver will generate the boilerplate code. Make sure to create a directory and not a group.
The project hierarchy should now look like this:
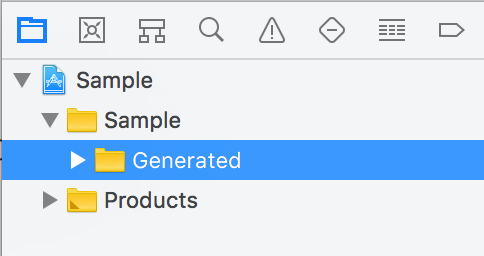 Directory hierarchy
Since Weaver works at compile time, it needs to be executed before the compilation happens. The easiest way to do that is to add a build phase to the project.
Let’s hit the button Sample -> Sample -> Build Phases -> + -> New Run Script Phase as shown in the following screenshot.
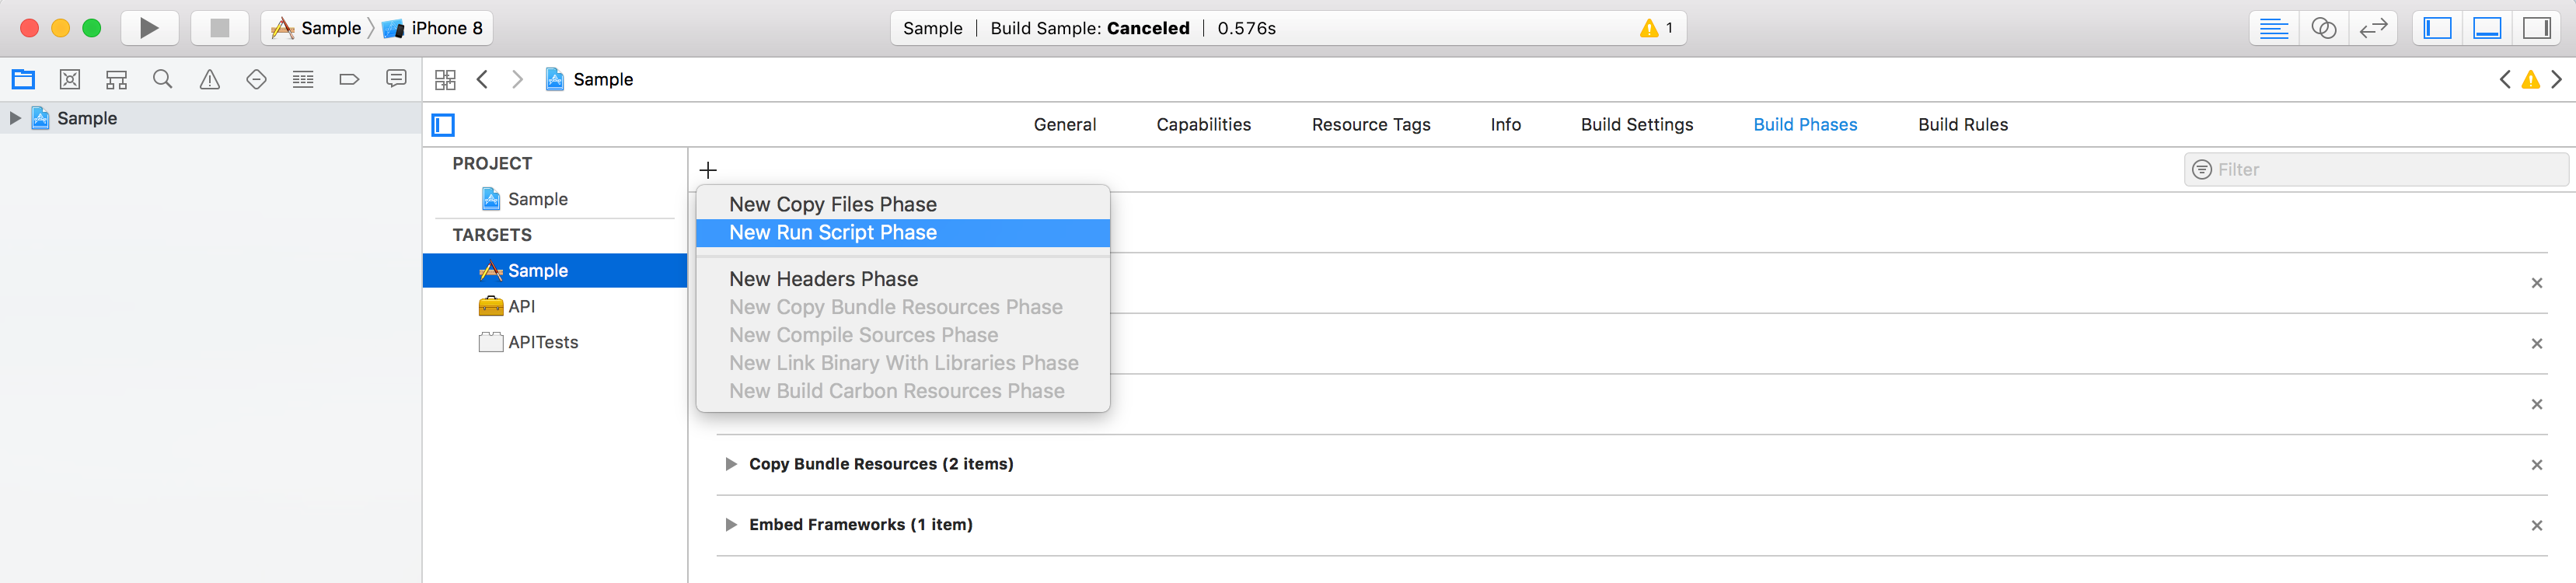 Sample -> Sample -> Build Phases -> + -> New Run Script
Rename it toWeaver and then, in the Shell window, add the following command line:
weaver swift --project-path $PROJECT_DIR/$PROJECT_NAME --output-path Generated --input-path "*.swift"
This command searches for all the Swift source files in the project, gives them as arguments to Weaver so that it can analyze the code and generate the boilerplate under the directory Sample/Generated.
**Make sure to move this build phase above the compilation phase. **If not, it will execute post compilation, which will most likely prevent the project from compiling correctly.
The list of build phases should now look like this:
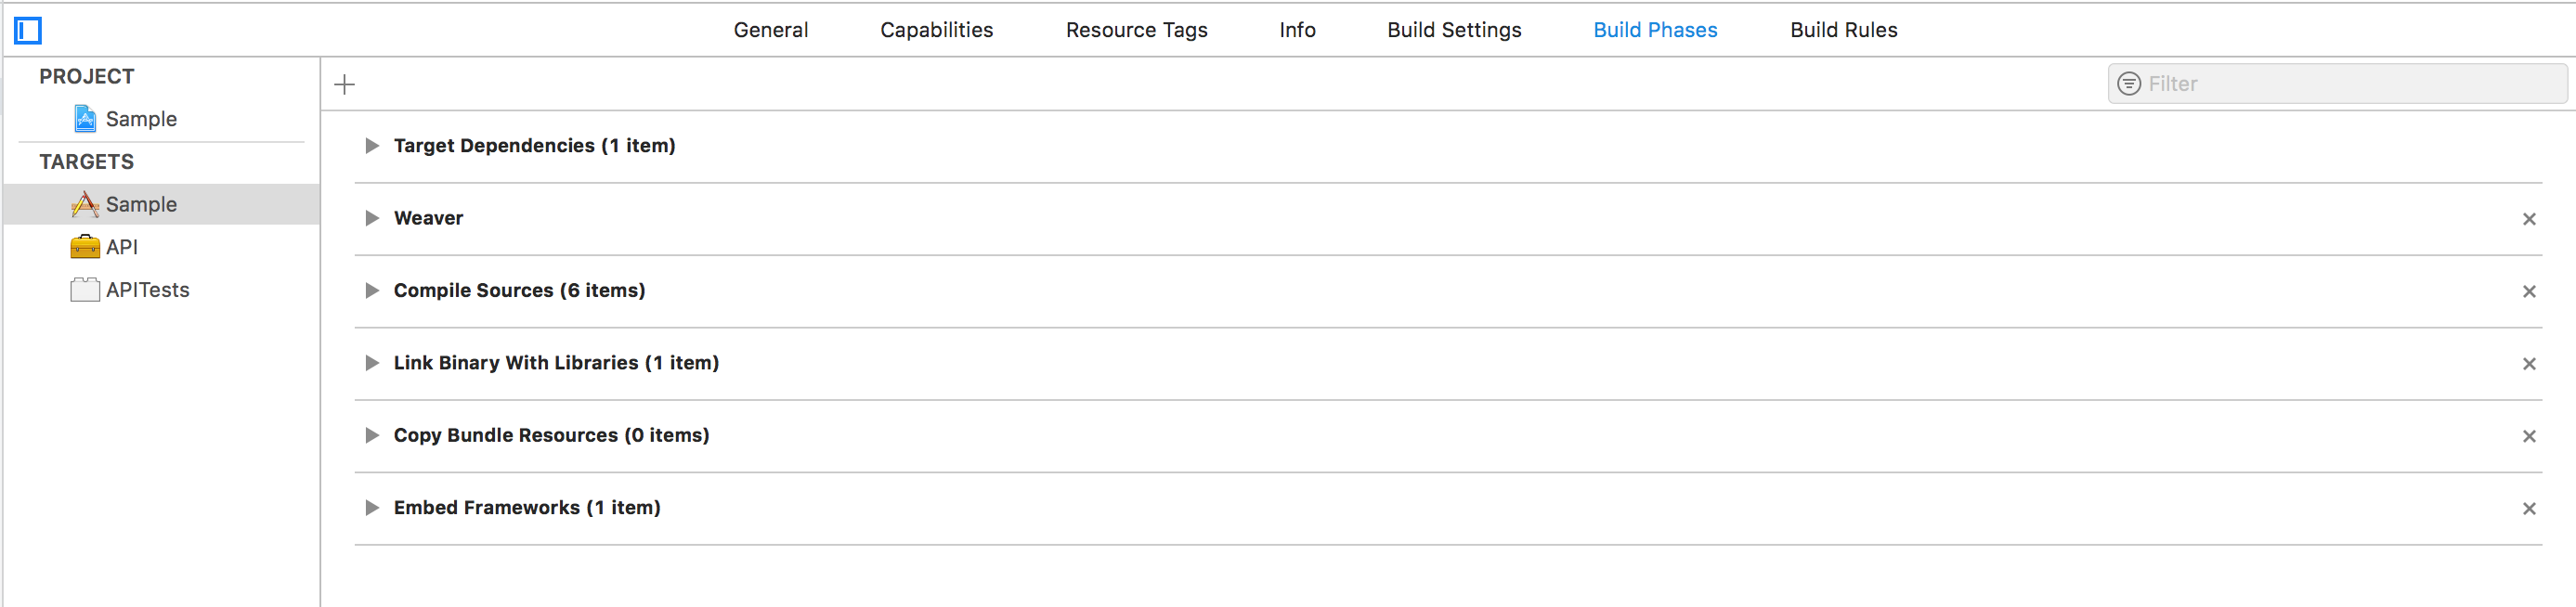 List of build phases
At this point, you should be able to hit cmd+b and the project should compile correctly. If you do that, you’ll probably notice that nothing actually gets written in the Generated directory. It’s because we haven’t started to inject dependencies yet.
4. First dependency injection
Let’s talk a bit about the application we’re trying to build here. It will be composed of:
-
a screen with a list of movies (HomeViewController)
-
a screen with the details of a movie (MovieViewController)
-
a screen with the reviews of a movie (ReviewViewController)
The HomeViewController will be the root controller of the app, the MovieViewController will show when tapping on a movie cell. Then from the MovieViewController, users will be able to tap the movie cover image to show the ReviewViewController.
We’ll start by creating the first two controllers, then we’ll take care of fetching and injecting the movies.
First thing first, let’s rewrite the AppDelegate.
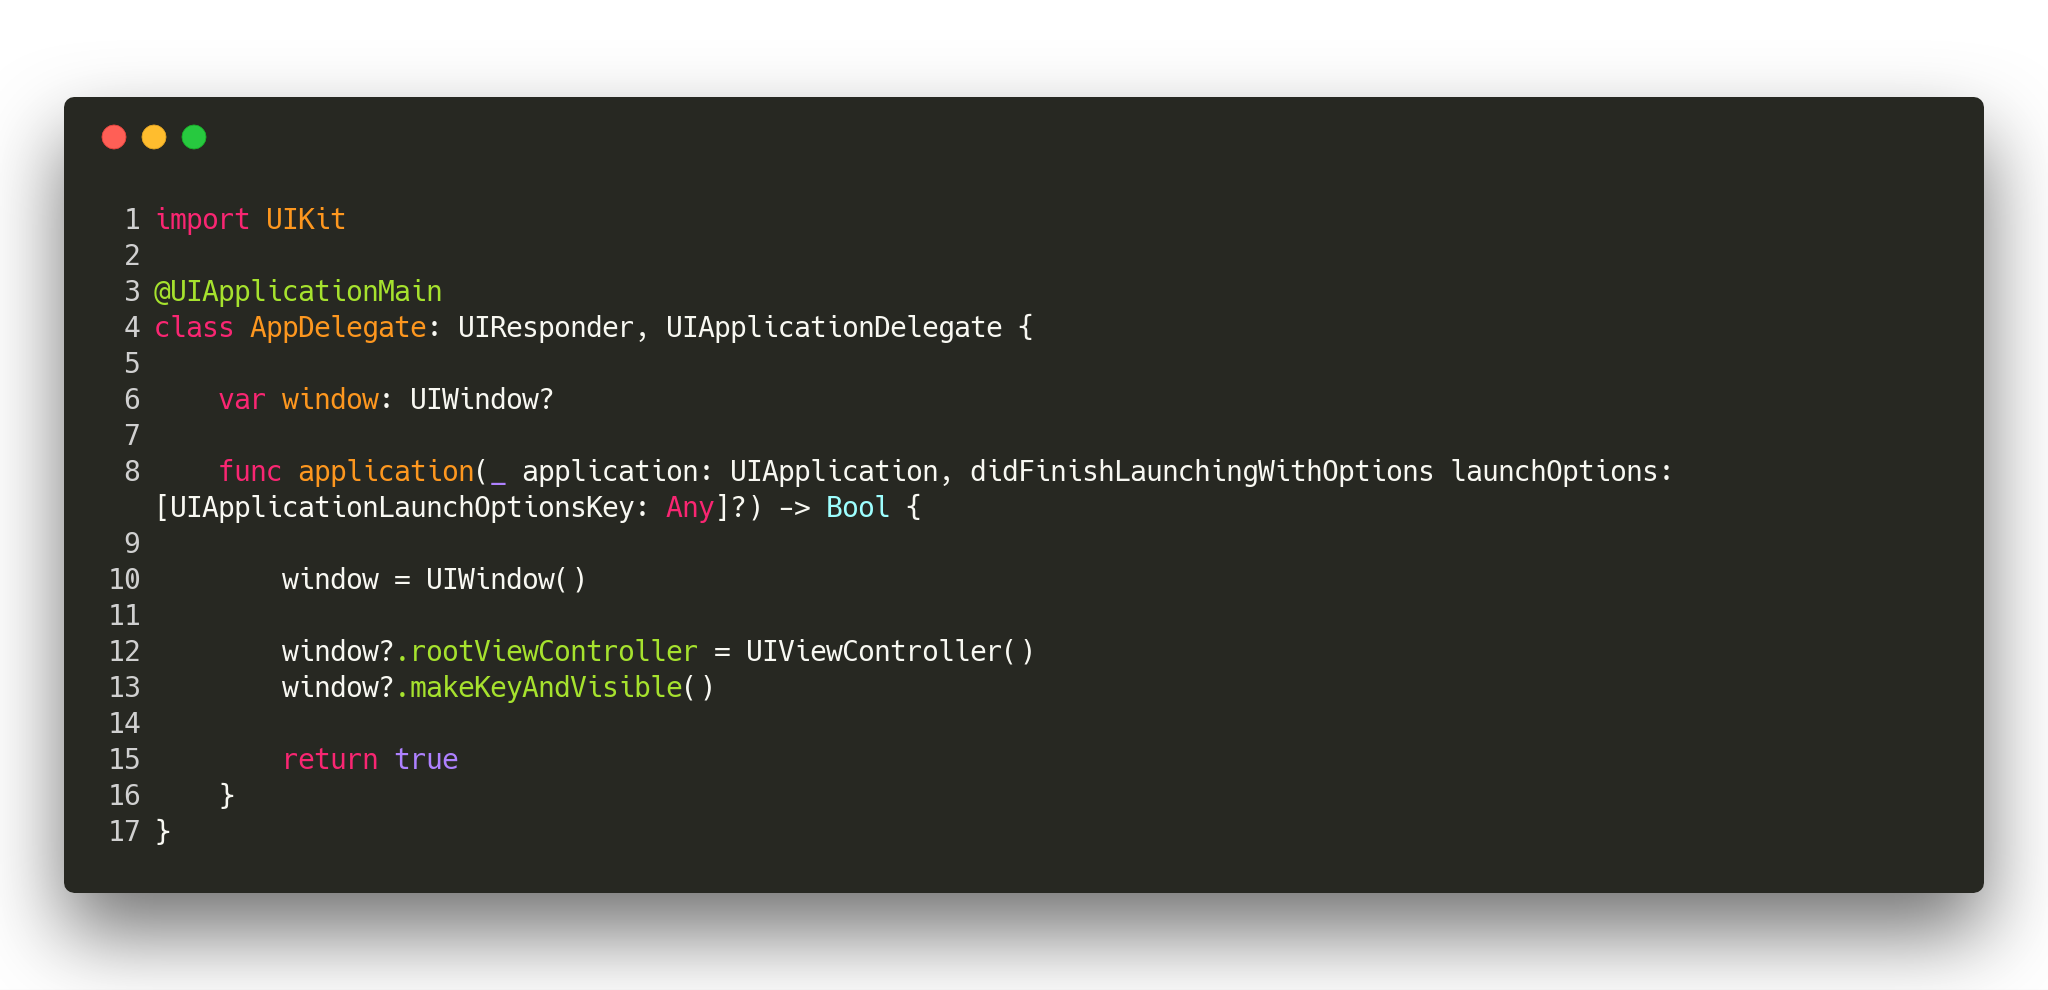
Before trying to show movies on the screen, let’s define what a movie is.
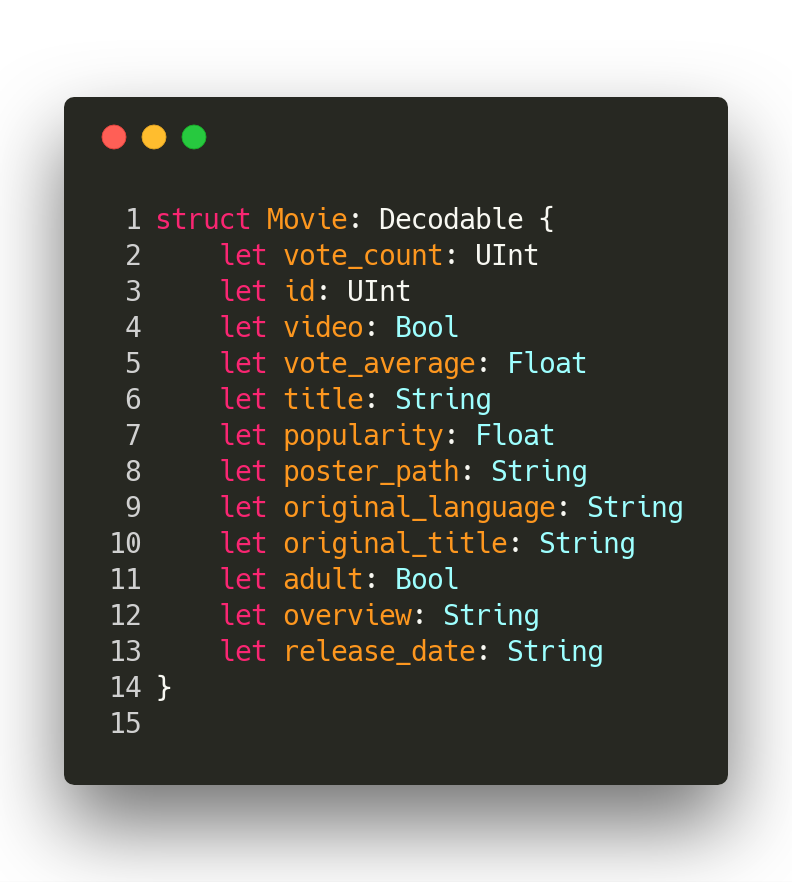
Note thatMovie implements Decodable because it will need to be built from a JSON payload later on.
Now that we have defined the Movie class, let’s create the HomeViewController class.
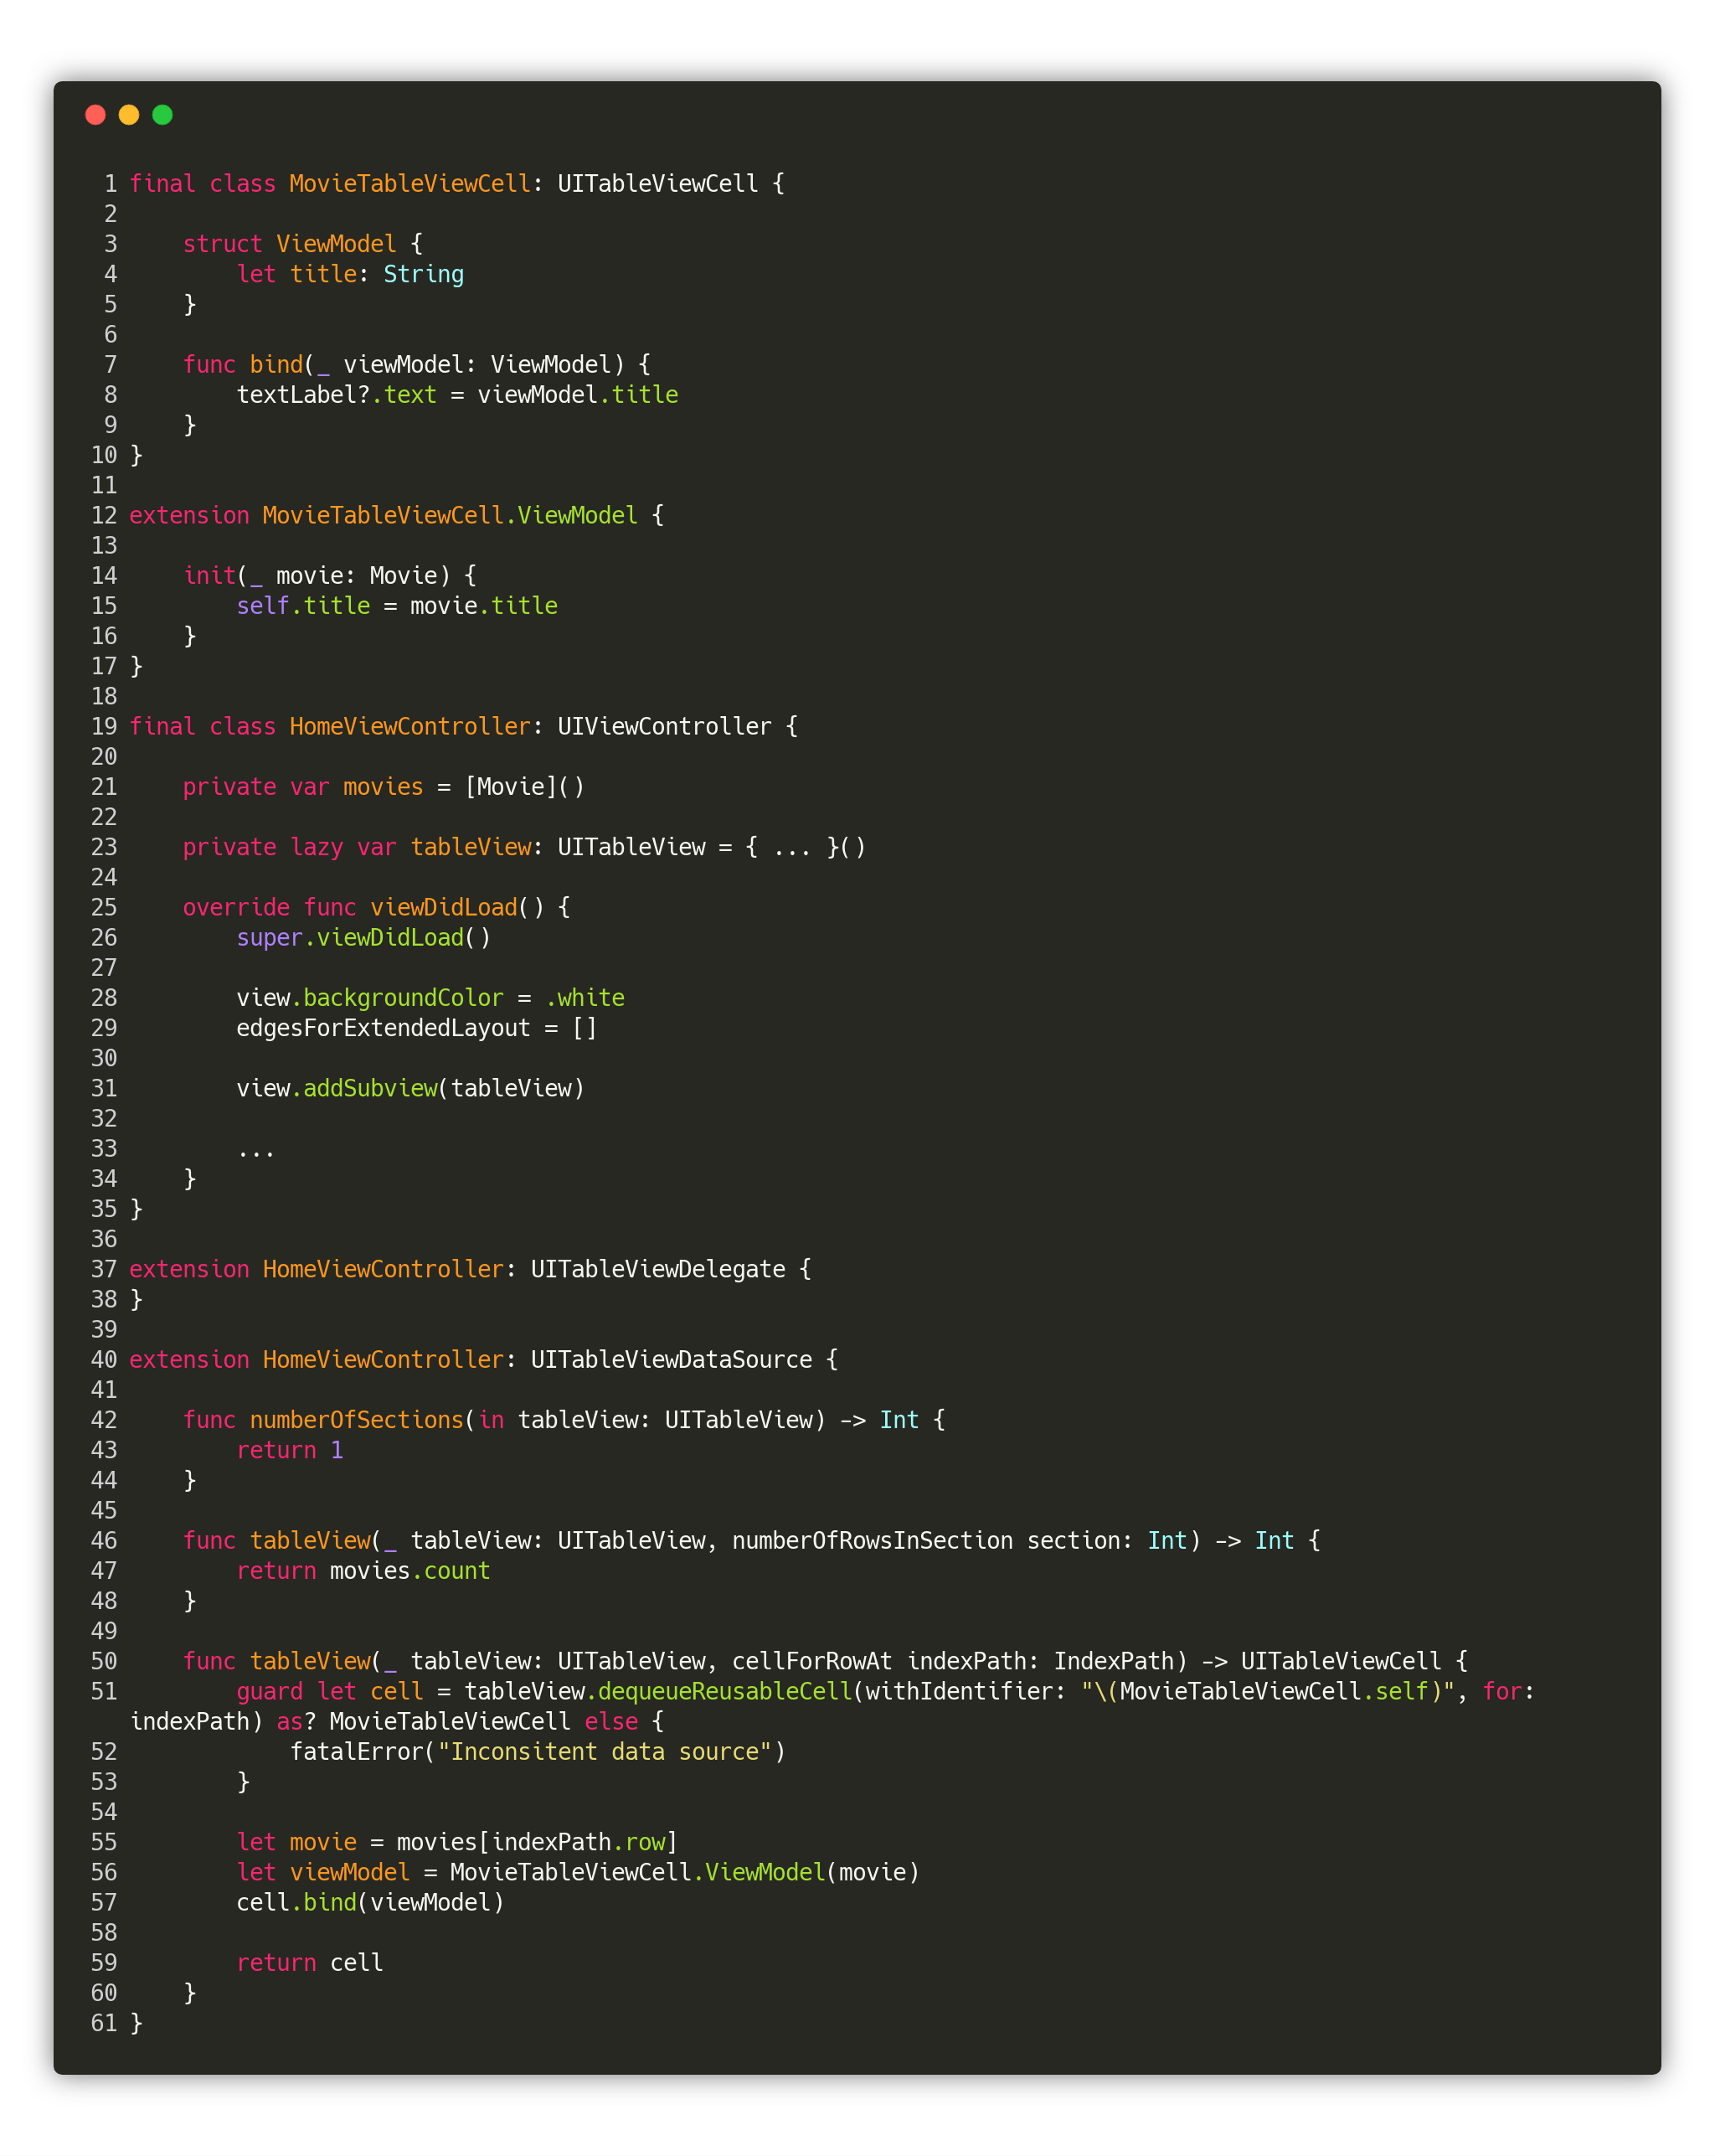 HomeViewController.swift on Gist
Nothing new here, this is only a regular controller with a UITableView implementing UITableViewDelegate/UITableViewDataSource.
Now, let’s come back to the AppDelegate. Of course, we could build a HomeViewController manually and set it to the window, but that wouldn’t work well with Weaver. What we will do instead, is use Weaver to register an instance of HomeViewController in the AppDelegate like so.
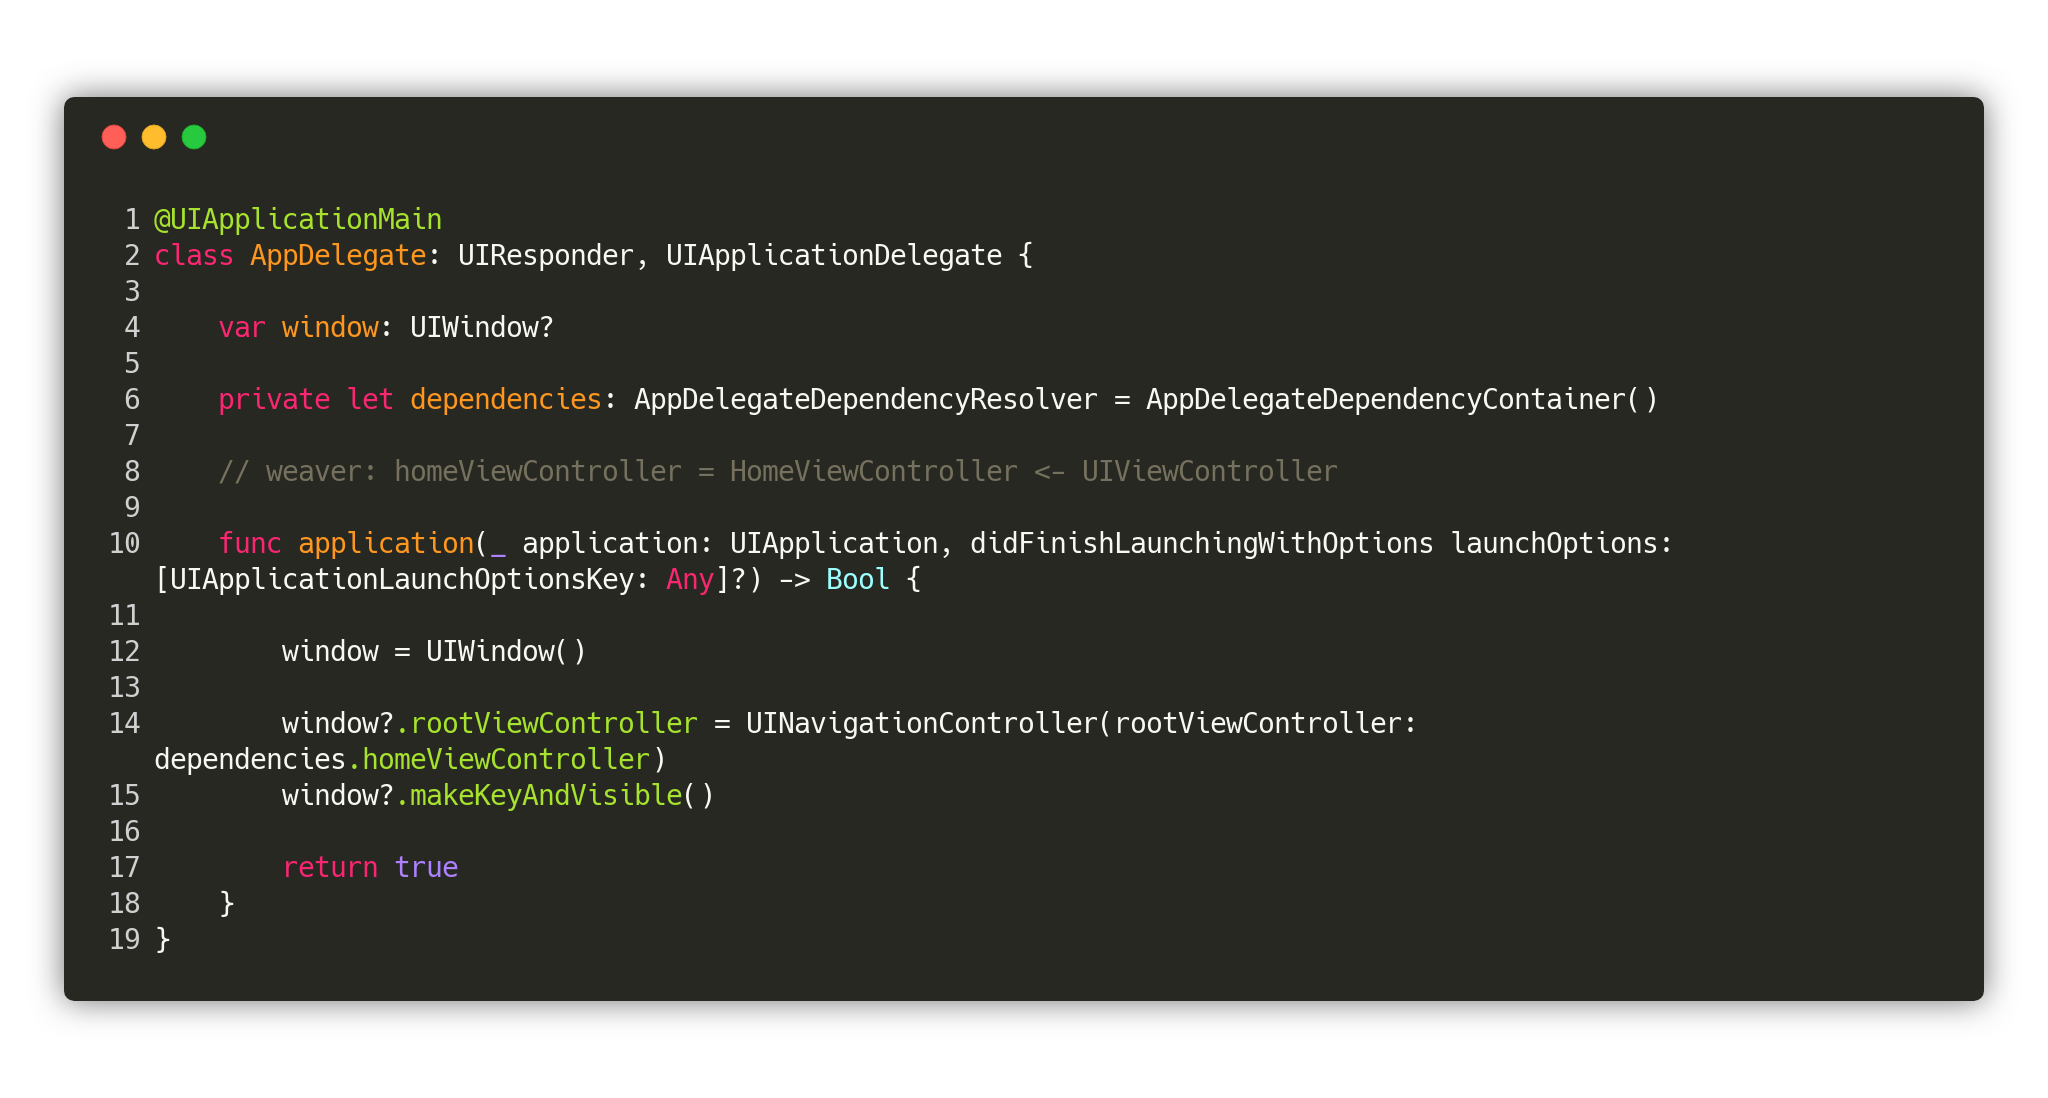
In this new version of the AppDelegate, we used // weaver: homeViewController = HomeViewController <- UIViewController to register an instance of HomeViewController in AppDelegate.
By default, HomeViewController is instantiated once, then reused. We’ll see how to personalize this behavior later on.
Also notice we have instantiated the AppDelegate’s DI container, which was generated by Weaver. Finally, we attached the instance of HomeViewController to the window.
By accessing the HomeViewController with dependencies.homeViewController, the DI container automatically creates an instance of HomeViewController, and since we registered it with the scope container, this instance will be created only once and then reused afterwards.
At this point if you try to compile, you’ll notice that the compiler fails because it can’t find the protocol AppDelegateDependencyResolver nor the class AppDelegateDependencyContainer. This is because we need to add the file Weaver.AppDelegate.swift Weaver generated for us to the project. It should be located into the Generated directory. Once the file is added, the project should compile and you should be able to see an empty UITableView at the screen.
That’s it, you just injected your first dependency.
5. Injection with parameters
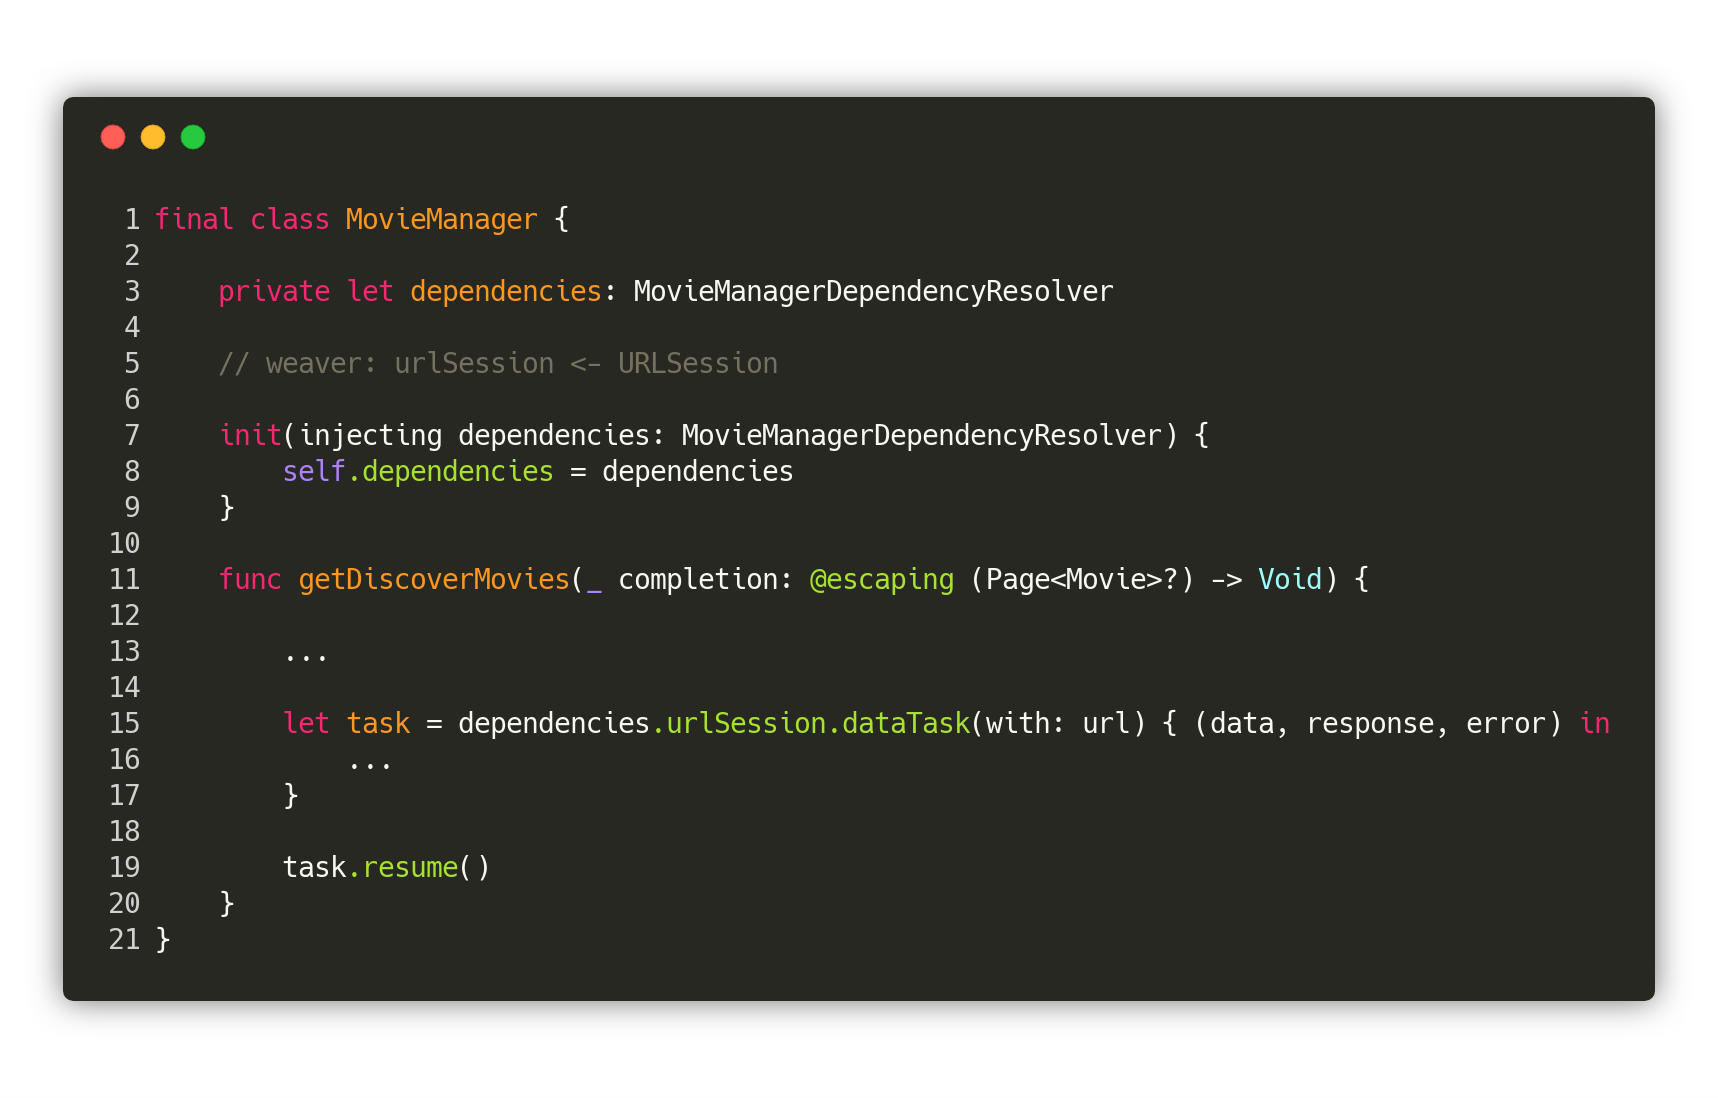
Next we’ll inject some movies intoHomeViewController. To do so, I propose to write a class called MovieManager which will basically fetch movies from the The Movie DB API, then inject it intoHomeViewController.
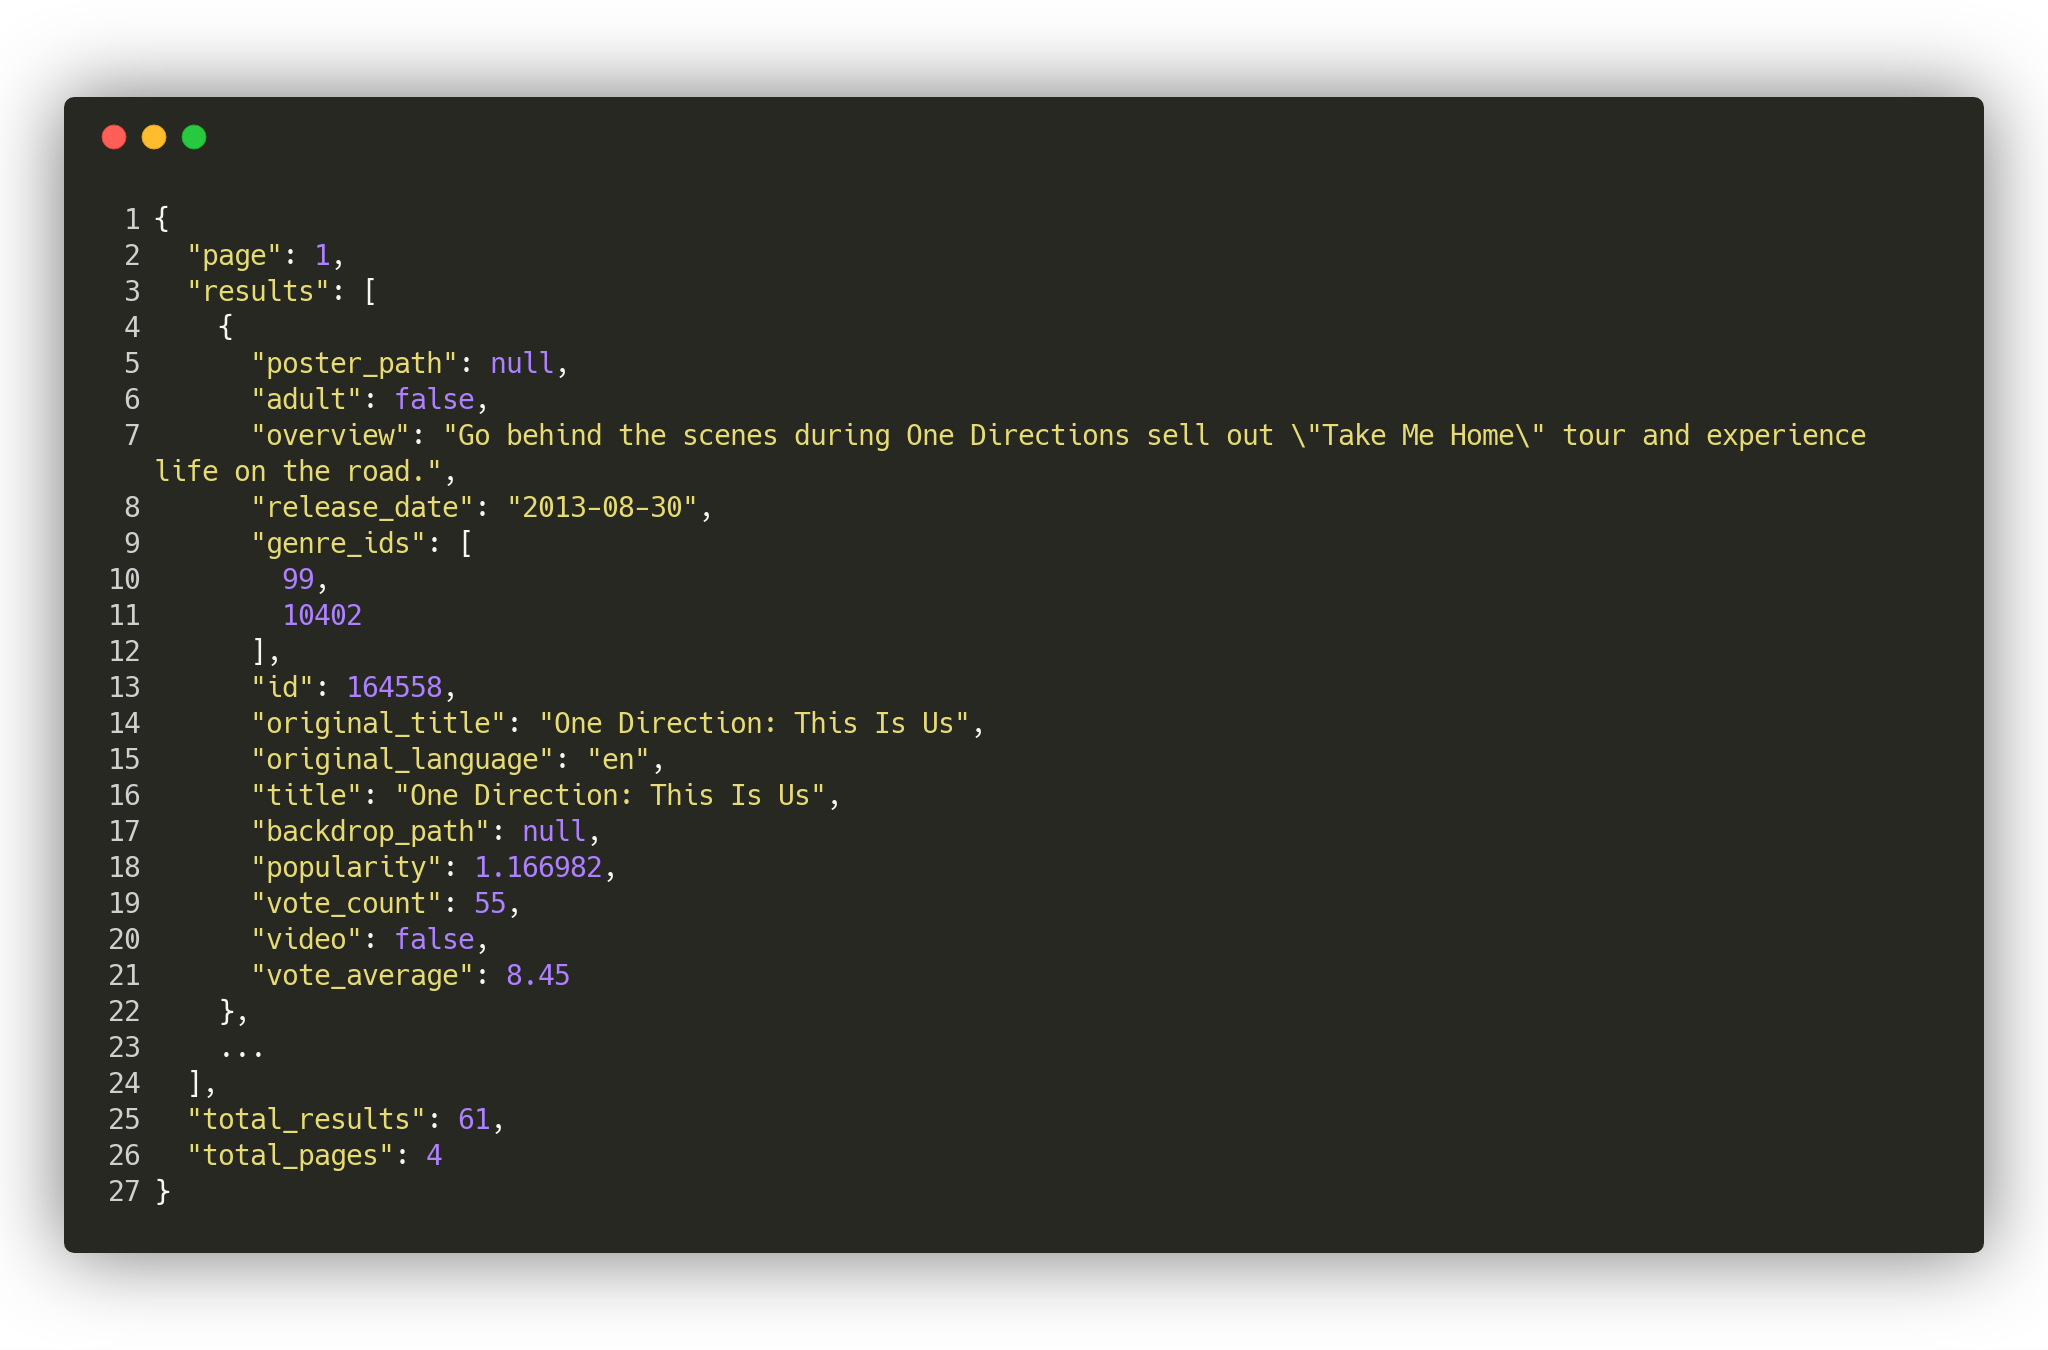
For this sample, we’ll use the TMDB Discover endpoint which returns a JSON payload containing a page of movies.
To be able to decode a page of movies, let’s declare a struct Page first.
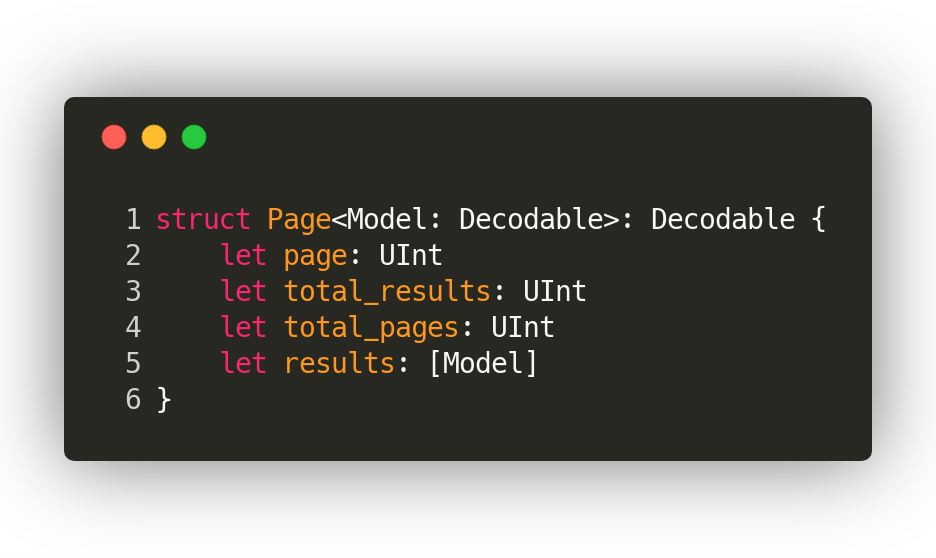
This struct takes a generic Model as an argument, which has to implement Decodable, making it able to contain and decode any type of item.

In the MovieManager class above, we declared the method getDiscoverMovies(_:) which completes with aPage. We used a shared instance of the URLSession to create a task, which hits https://api.themoviedb.org/3/discover/movie?api_key=1a6eb1225335bbb37278527537d28a5d. When the task gets a response, it parses it and turns it into a Page and completes. This code is far from perfection but it does the job. I’ll talk about ways of improving it later on.
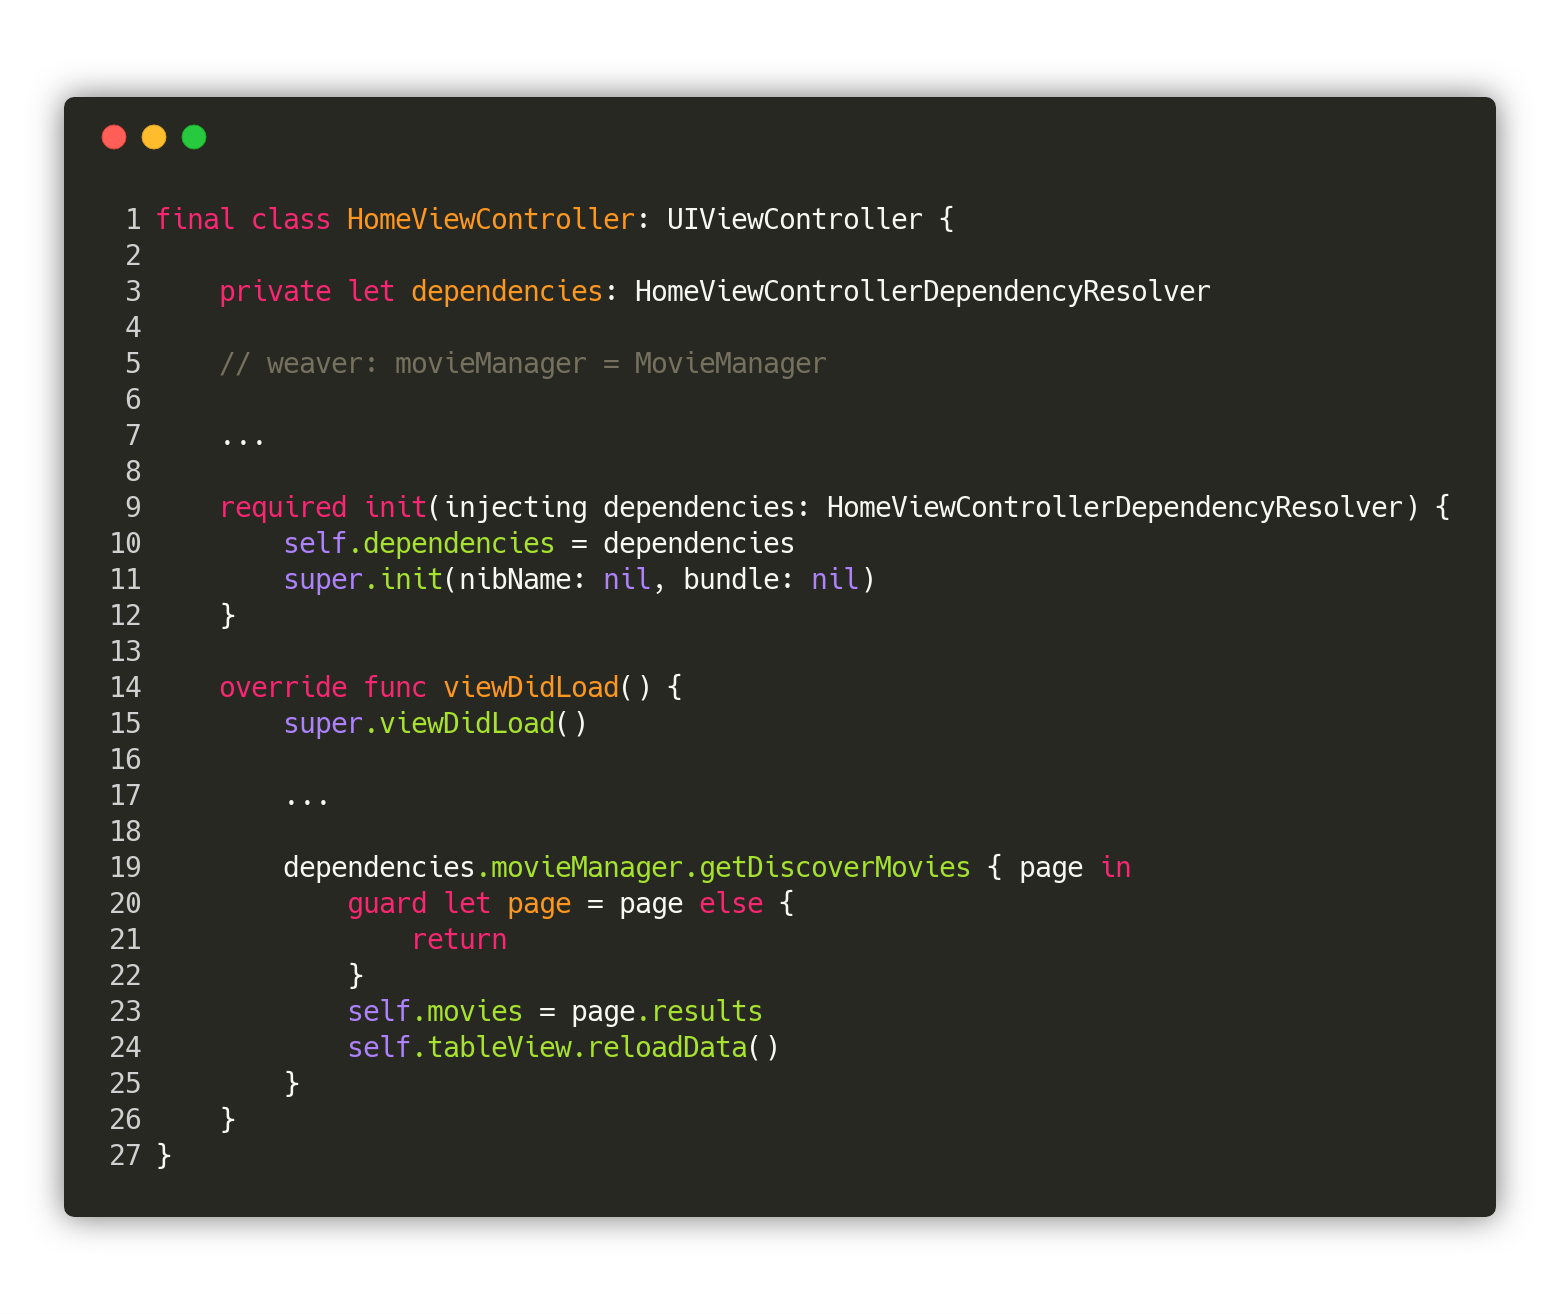
Now that we have a MovieManager, we can inject it into HomeViewController.
 HomeViewController.swift on Gist
The same way we injected HomeViewController intoAppDelegate, we can use Weaver to inject MovieManager into HomeViewController.
Note that this time, rather than instantiating the dependency container directly, we wrote a new initializer init(injecting:) and stored it. The reason for this is because we want to be able to resolve shared dependencies, and to do so, we need to get the dependency container from the call site. Notice how this is different from the special case of the AppDelegate which is the root class of the application, thus, doesn’t have any call site, leaving us no other choice but to instanciate the dependency container manually.
Also note how we store the dependency container privately. Unless you want to expose all of the dependencies to the outside world, I’d say that it’s best practice to keep it private. I’ll explain later in this post how to share a dependency between classes with Weaver.
Once the dependencies are injected properly, we can call dependencies.movieManager.getDiscoverMovies(_:) and load the movies into UITableView.
And of course, don’t forget to add the file Weaver.MovieViewController.swift in the project so that it compiles correctly.
Nothing really new so far. Let’s make this sample a bit more complex and add a MovieViewController which will show the details of a movie. To do so, we’ll need to instantiate MovieViewController with a Movie. Let’s jump to the code to see how Weaver can help us do that.
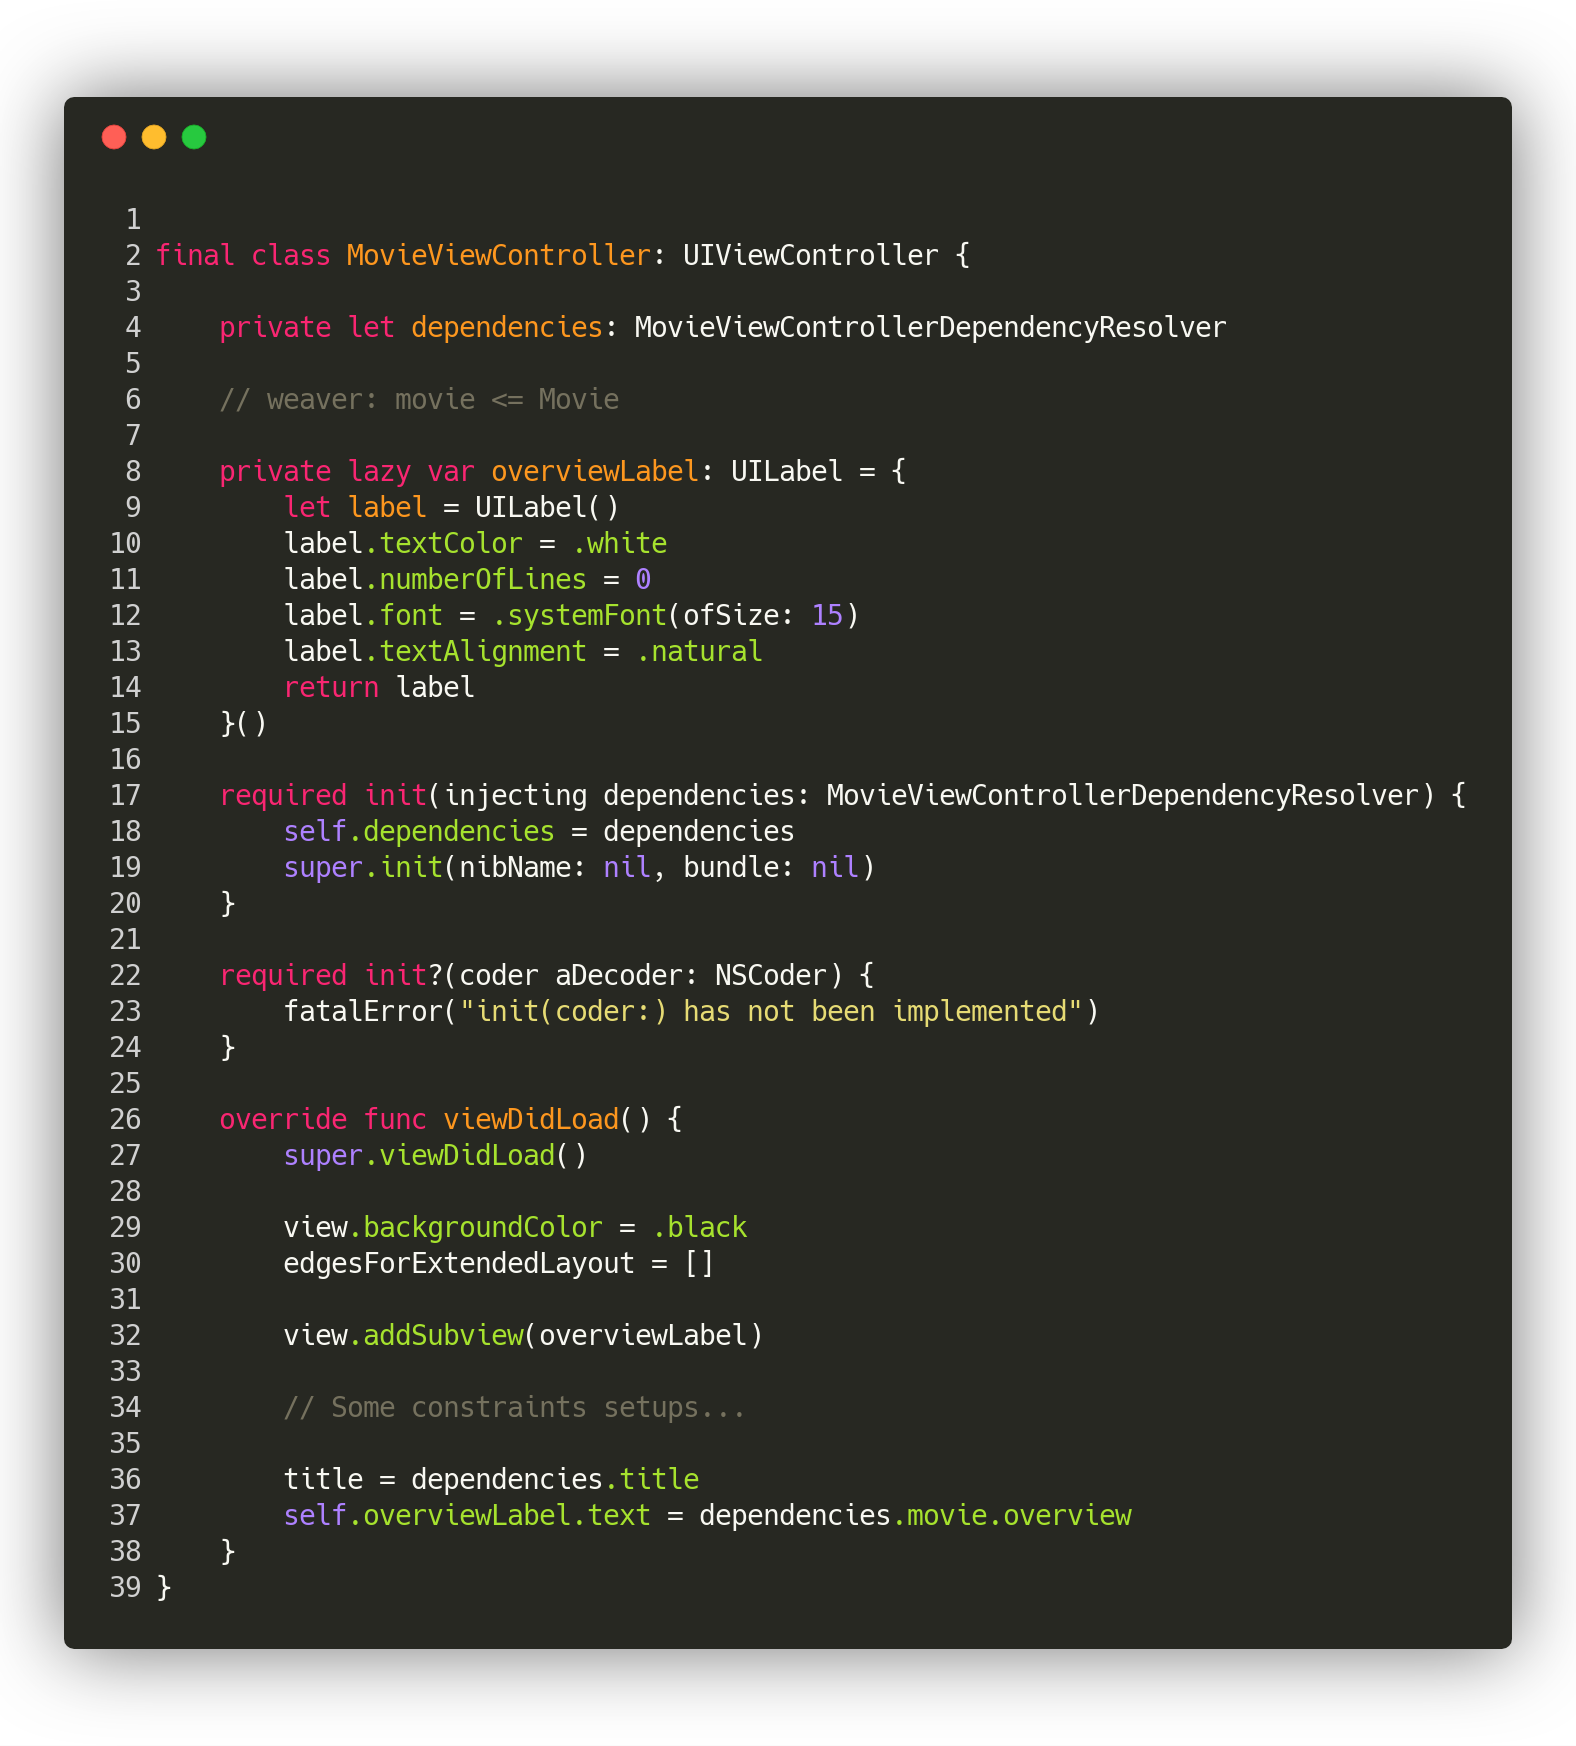 MovieViewController.swift on Gist
You probably noticed an annotation I never mentioned before; // weaver: movie <= Movie
It makes Weaver aware that resolving MovieViewController requires a movie.
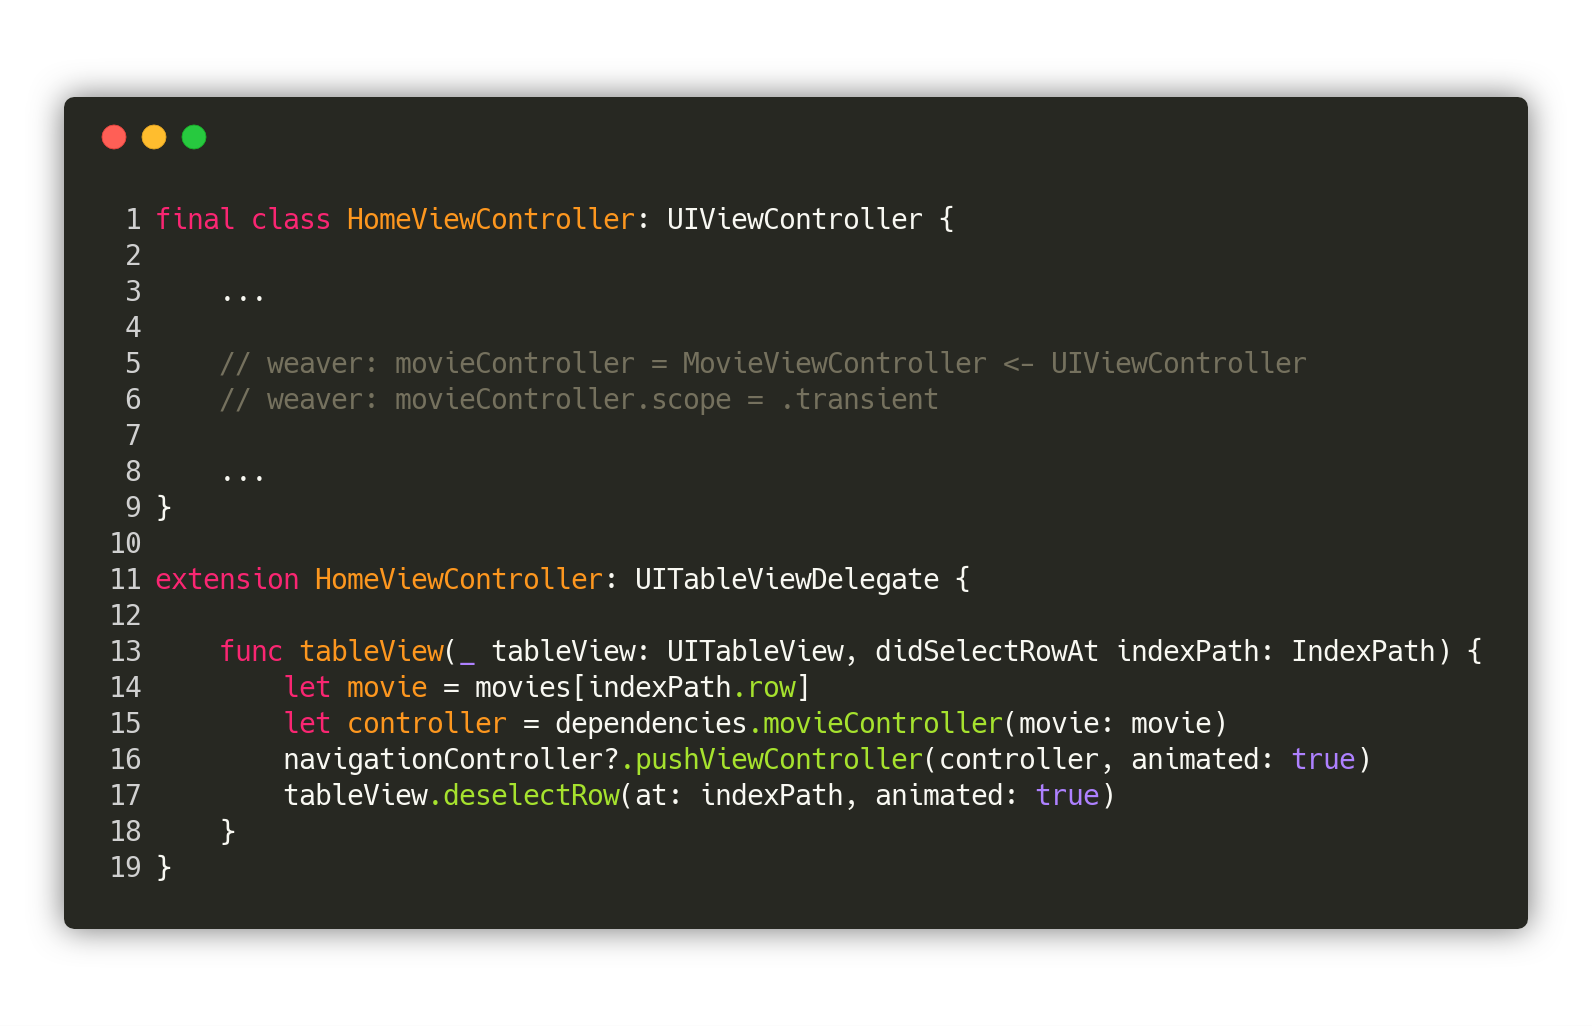 HomeViewController.swift on Gist
Here we use the annotation // weaver: movieController = MovieViewController <- UIViewController, which tells weaver to generate an accessor to movieController from the HomeViewControllerDependencyContainer. This way, when the user taps on the cell, we can use the method dependencies.movieController(movie:) to build a new MovieViewController and push it to the stack.
Then we use a new annotation // weaver: movieController.scope = .transient in oder to personalize the default instantiation behavior. The transient scope tells Weaver to create a new instance for each resolution, which means that a new MovieViewController is pushed each time the user taps a cell. You can find the different available scopes in the documentation.
Also note that using any scope other than transient to resolve a dependency that takes arguments doesn’t make much sense. Weaver allows it, but be aware that the second time the dependency will get resolved, the argument(s) will be ignored as your initial object has become shared.
6. Custom builders
So far, the MovieViewController isn’t great. It only shows text. We should show an image of the movie’s cover to make it feel a bit more real.
To do so, we’ll need to fetch an image from TMDB, for example, from the following url: https://image.tmdb.org/t/p/w1280/7WsyChQLEftFiDOVTGkv3hFpyyt.jpg.
This will be the purpose of the following ImageManager class.
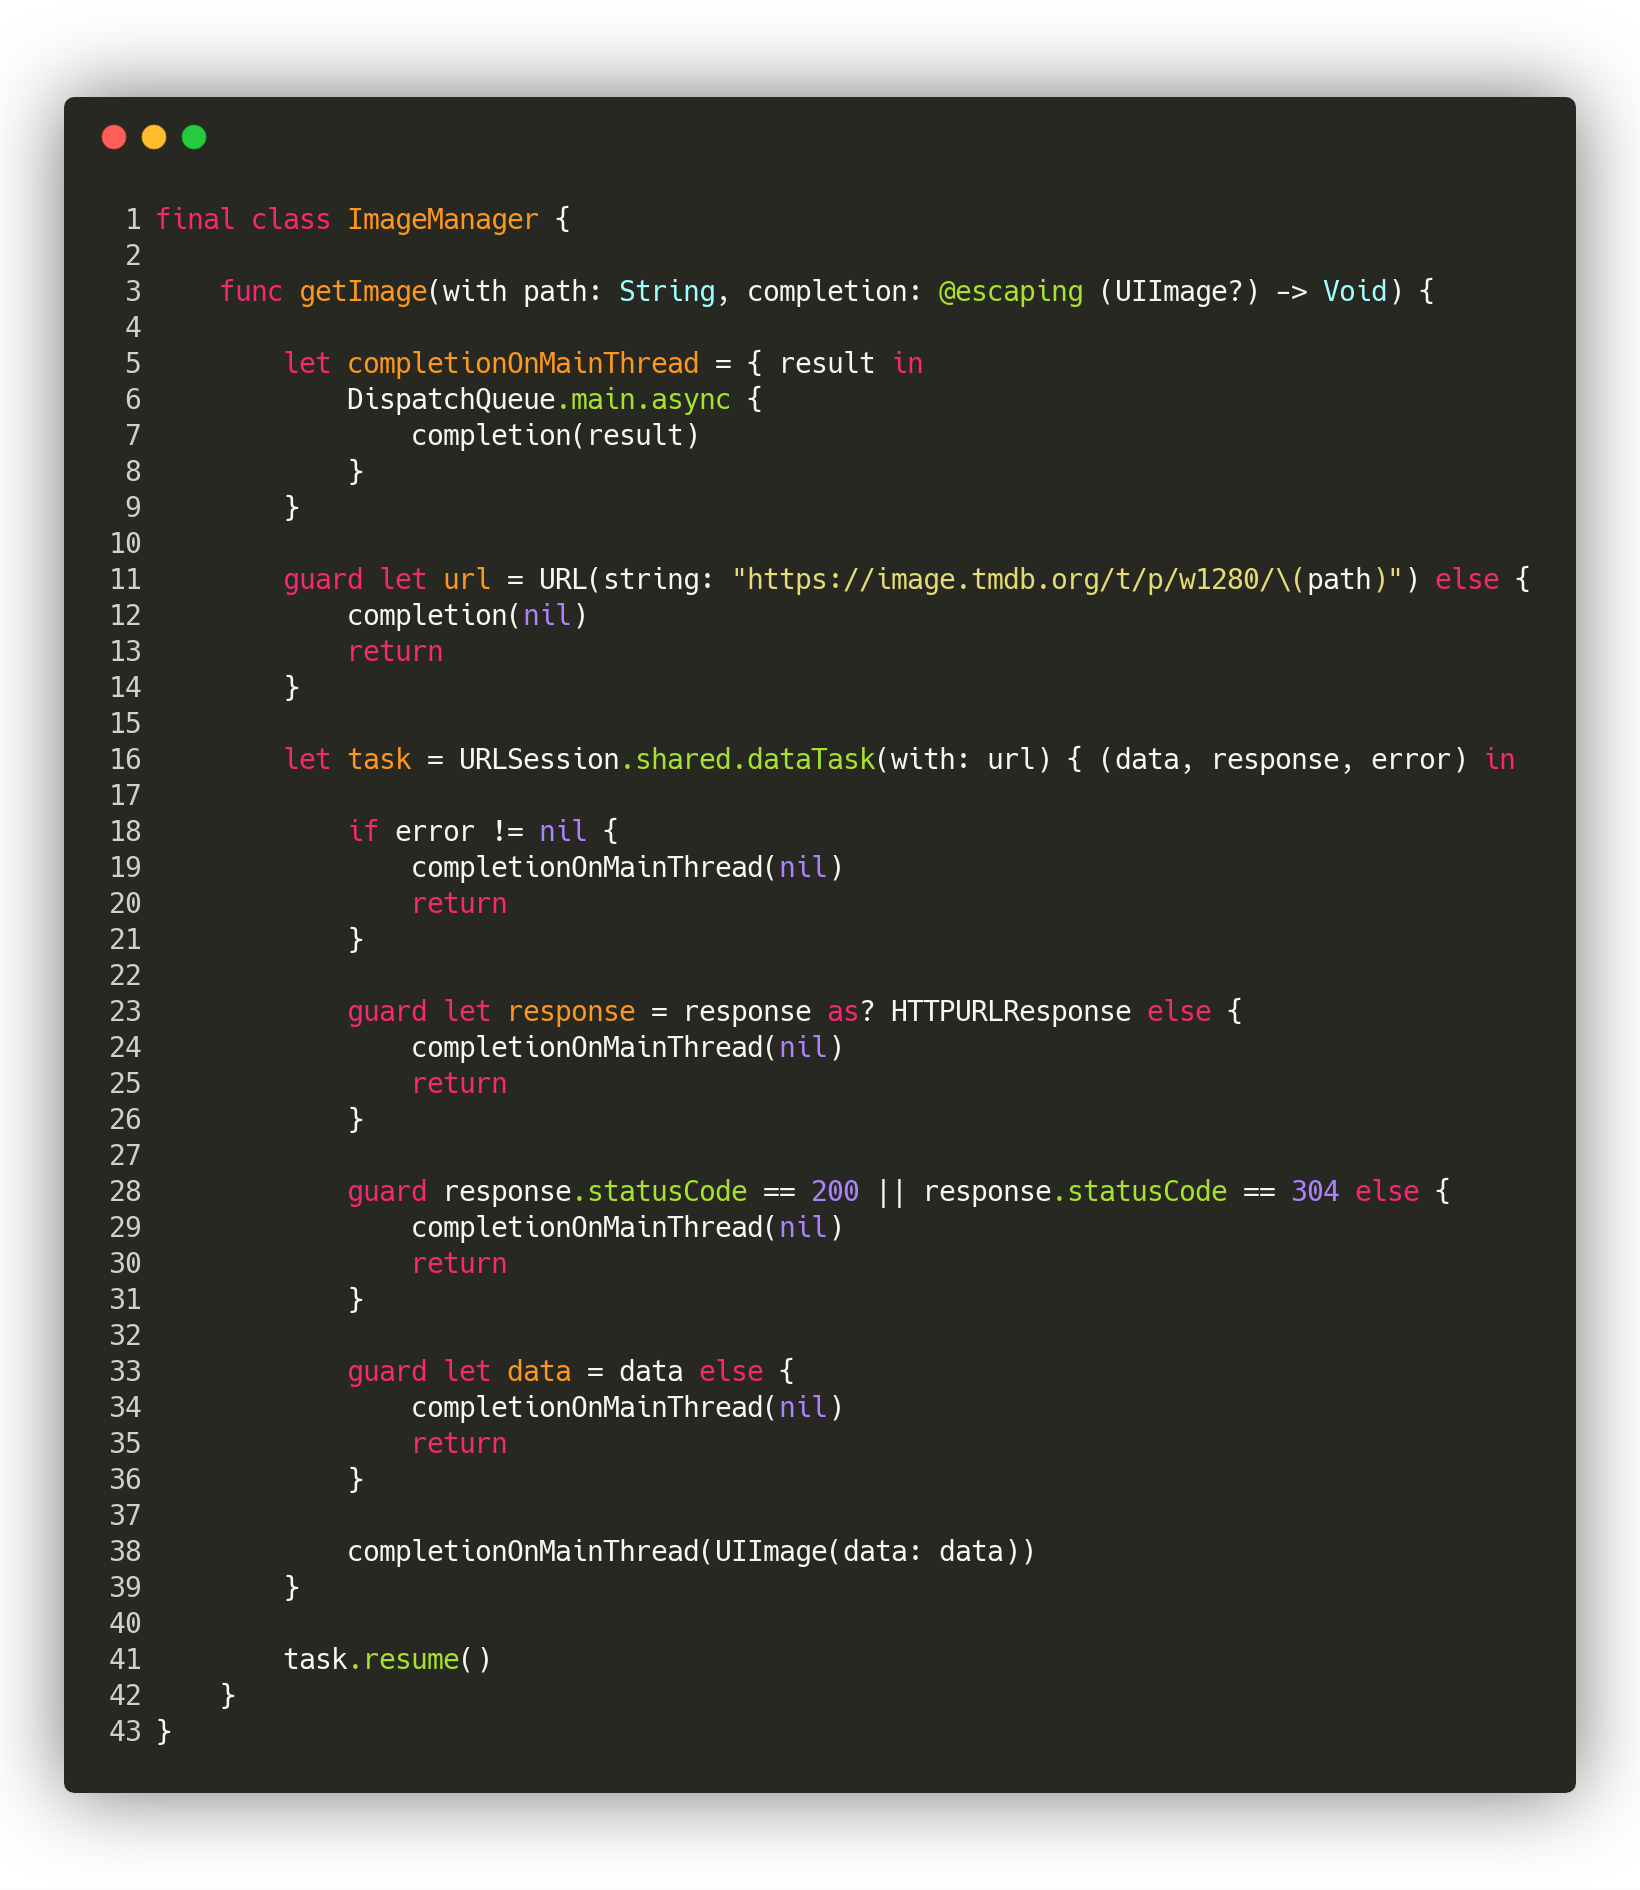
So far, this manager is not so different from MovieManager. It’s also not quite correct in terms of dependency injection because it uses a singleton of URLSession of having it injected. Remember when I told you I would cover ways to improveMovieManager? Well, that’s one of them.
The following injects URLSession the same way we injected HomeViewController in AppDelegate.
If you try to compile and run the application at this point, you’ll see that it crashes because URLSession needs to be build with a configuration parameter to work properly. To make this work, Weaver needs a custom URLSession builder.
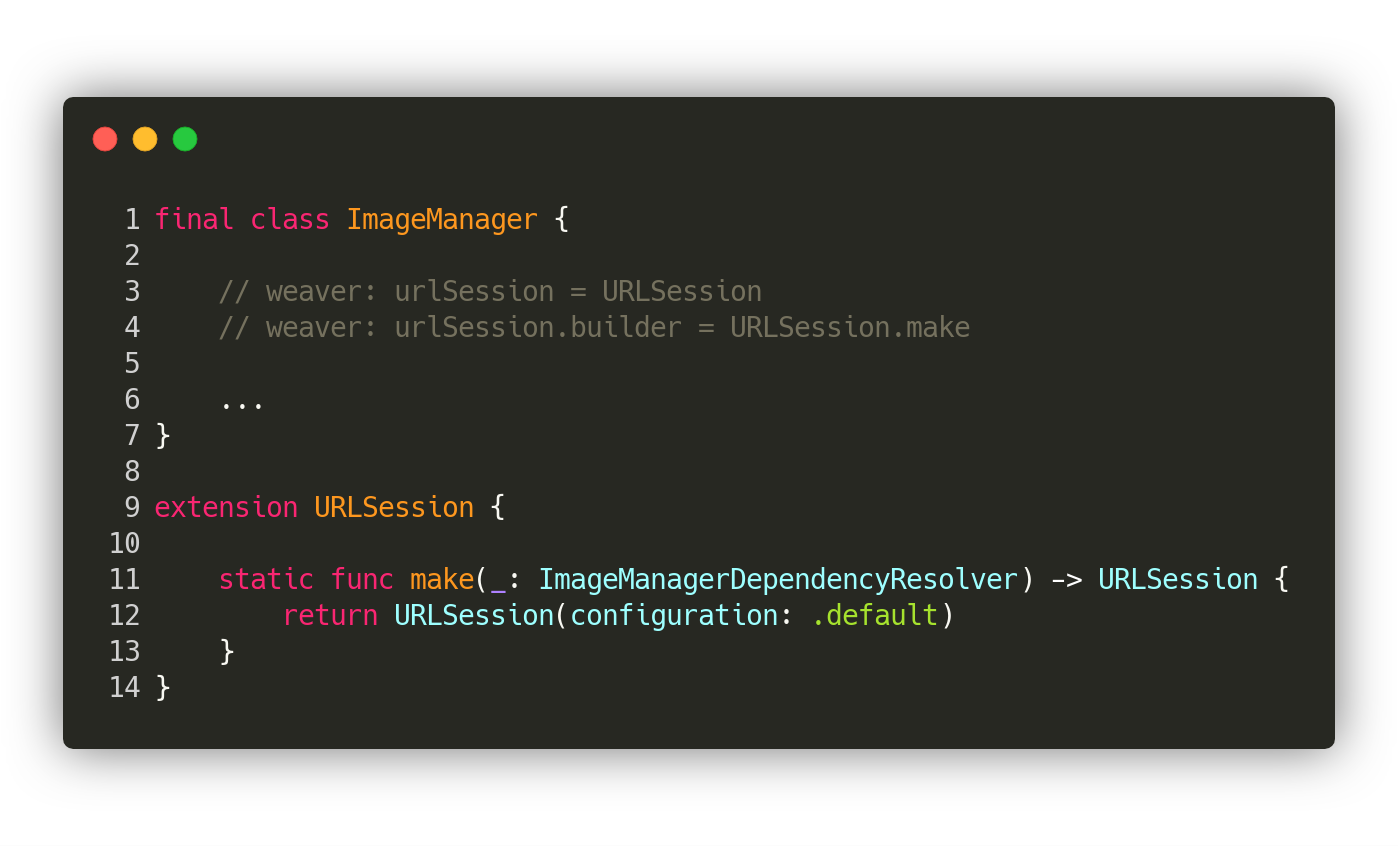
In the code above, I added the annotation: // weaver: urlSession.builder = URLSession.make to make Weaver know that we want to implement our own URLSession builder. Then I wrote the method make() -> URLSession which is automatically called by the dependency container when resolving theURLSession.
By the way, MovieManager having the same issue we could do the same thing for it as well.
ImageManager is now ready to be used in MovieViewController, which is what you’ll see in the following code.
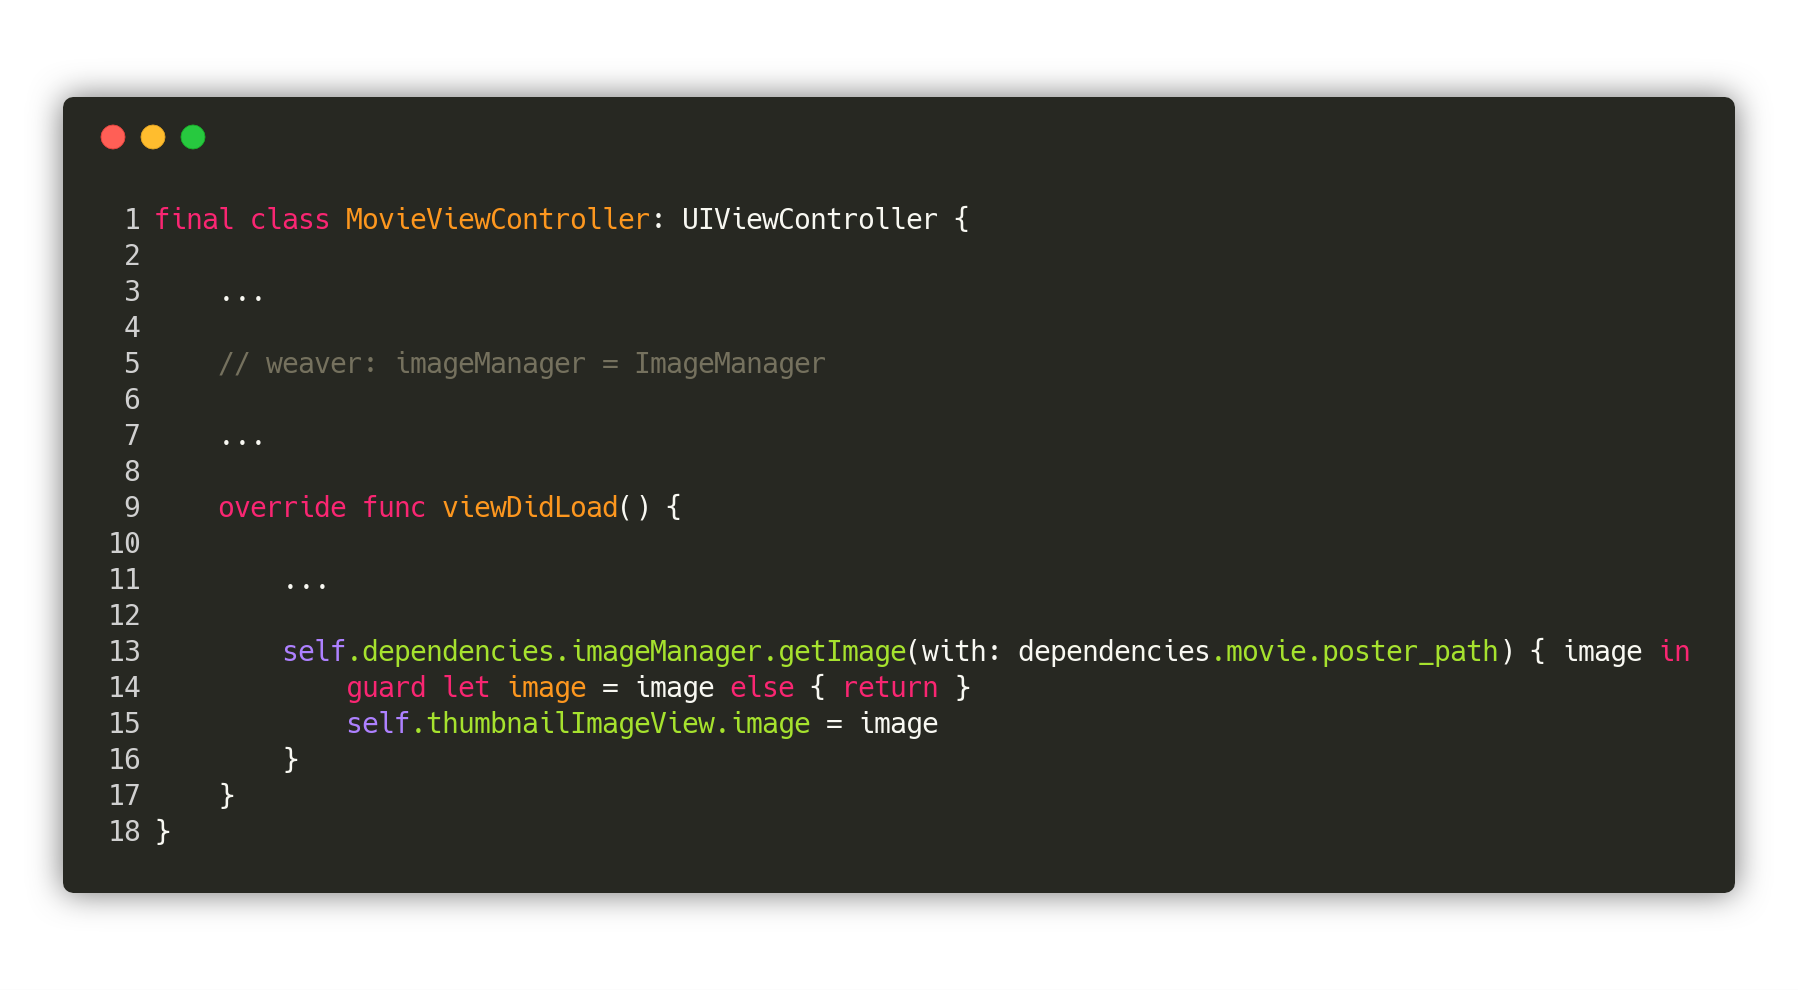 MovieViewController.swift on Gist
7. Shared dependencies
Although all of this works fine, it’s still a bit too much code to write to only inject URLSession,which will most likely be used a lot throughout the project. It’d be better to have to write this make(_:) method only once.
What if we could share one URLSession instance which bothImageManager and MovieManager could use? Let’s see how Weaver can help with that.
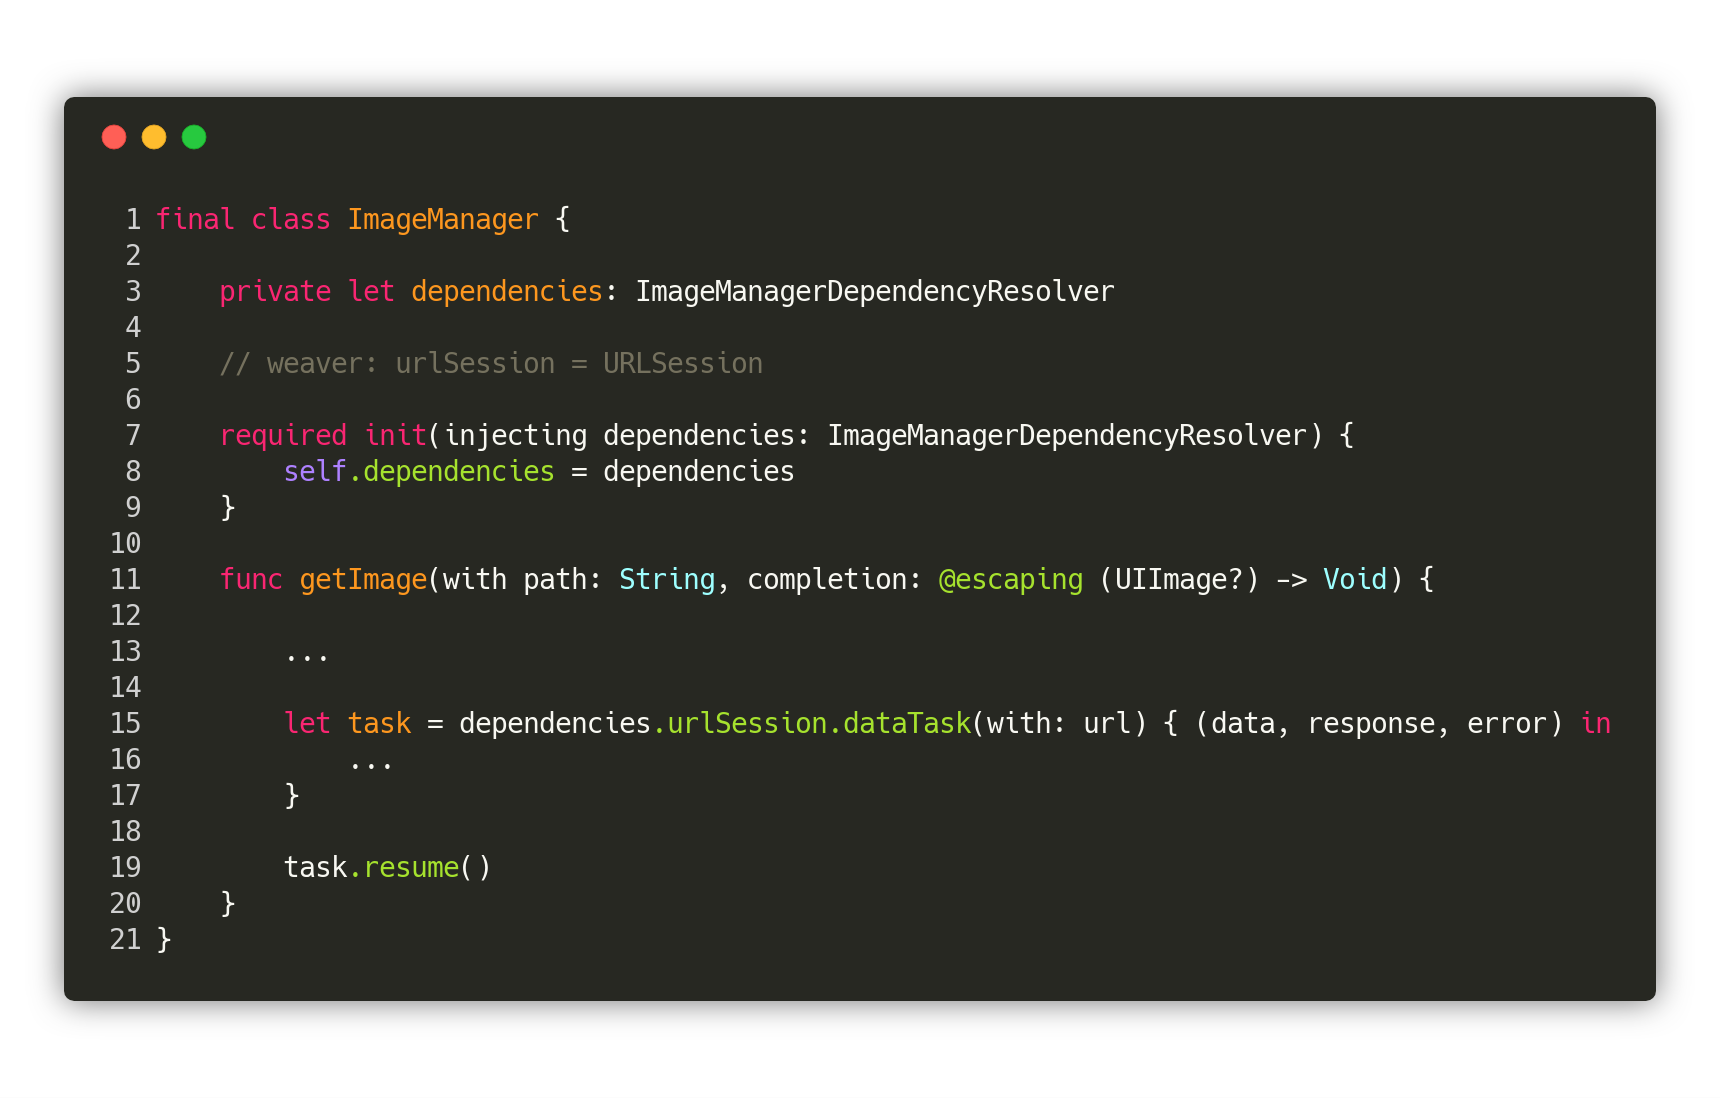
First of all, we need to declare a reference of URLSession in both ImageManager and MovieManager.
Previously we had typed: // weaver: urlSession = URLSession and we’re changing it to: // weaver: urlSession <- URLSession.
If you try to compile this, you’ll see that Weaver complains about the fact that urlSession isn’t resolvable.

To resolve a reference like this one, Weaver recursively goes through all of the direct ancestors of ImageManager and checks if there’s an instance of URLSession registered for each one of them. If there’s one ancestor which doesn’t, it explore’s its ancestors the same way and so on until the instance is found or there’s no more ancestors to explore. In this case, Weaver’s hitting the root (AppDelegate), then fails because there’s no more ancestors to explore and we’re still missing an instance of URLSession.
To fix this we need to register a shared instance of URLSession in a common ancestor of MovieManager and ImageManager.
 Dependency Graph
Looking at the dependency graph above, we can easily deduce that HomeViewController and AppDelegate are the only two common ancestors of MovieManager and ImageManager. For conveniency, we’ll pick AppDelegate.
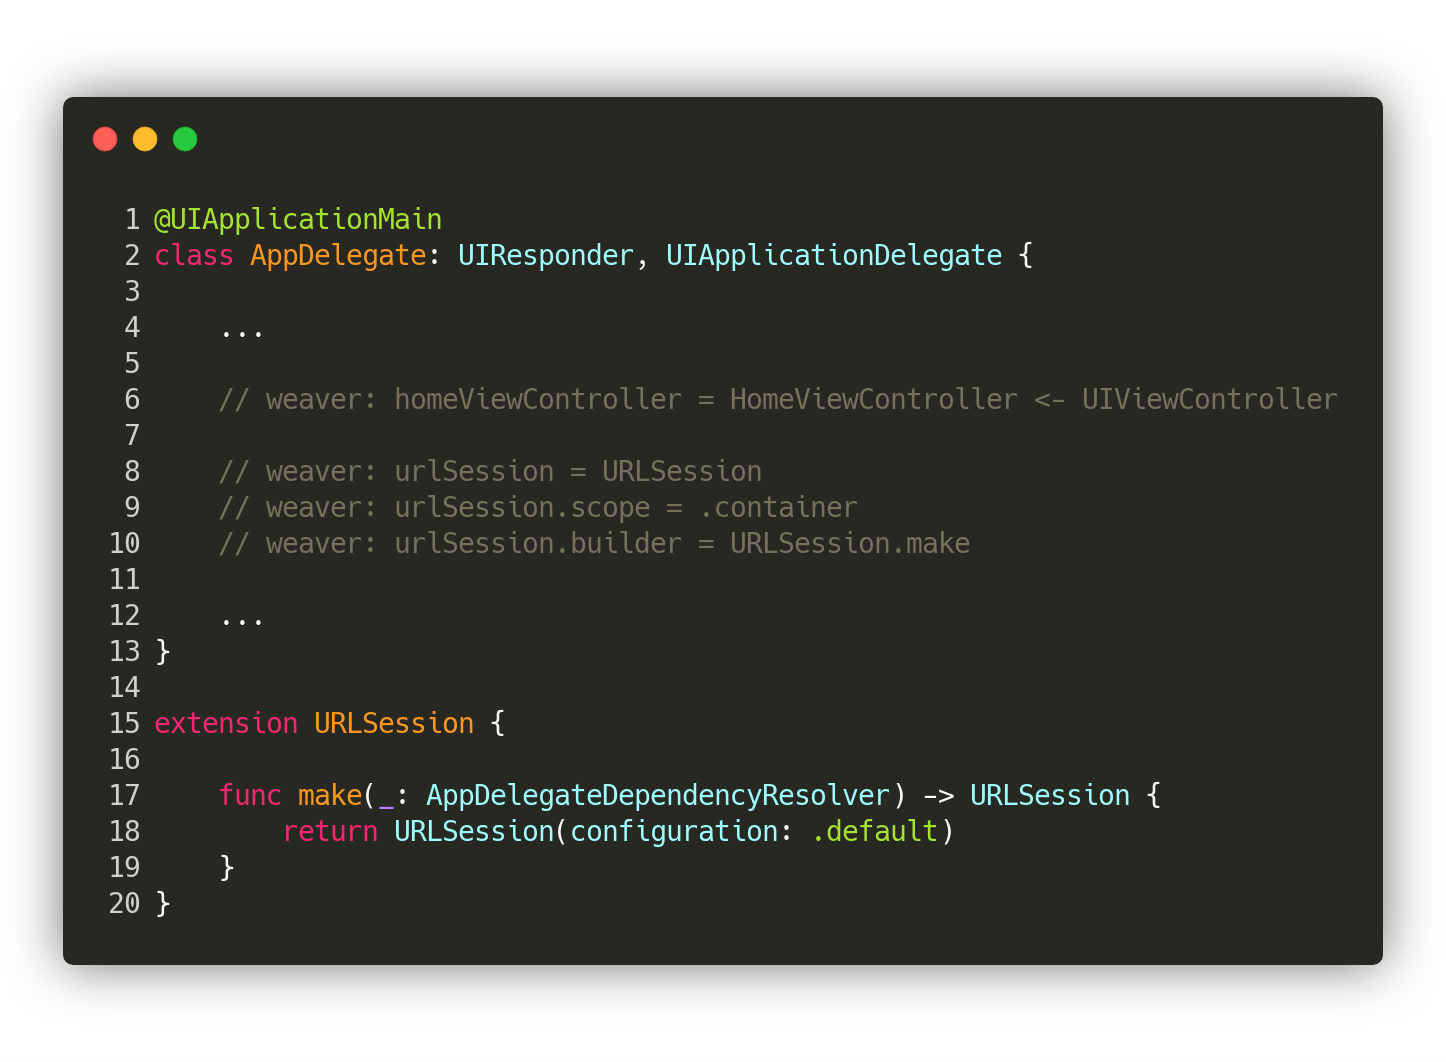
Note how we used the new scope container here. This scope does the same thing than the default one, but also exposes the dependency to the adjacent objects in the dependency graph. In this example, since we exposed urlSession from AppDelegate, the whole graph has access to it. If we had exposed it from MovieViewController, only ImageManager would have had access to it.
Finally, we can declare a reference of URLSession in MovieManager so it uses the same instance than ImageManager.
This is a very common scenario which you’ll see a lot if you start using Weaver in your project. In fact, this shared instance of urlSession shows all the advantages of a singleton, without the disadvantages. Indeed, since we registered it at the root, it’s accessible throughout the entire app but it’s still injected, and thus, easily override-able and testable. I’ll explain how in an another tutorial.
8. ObjC compatibility
So far we saw how Weaver smoothly integrates into a Swift codebase, but what if we were working on a project containing classes written in ObjC?
Once again, Weaver has got us covered. Let’s see how we implement the last controller of this sample project; ReviewViewController.
This controller will show up when tapping on a movie cover image in MovieViewController. It will be written in ObjC, and will basically be a UITableView of reviews.
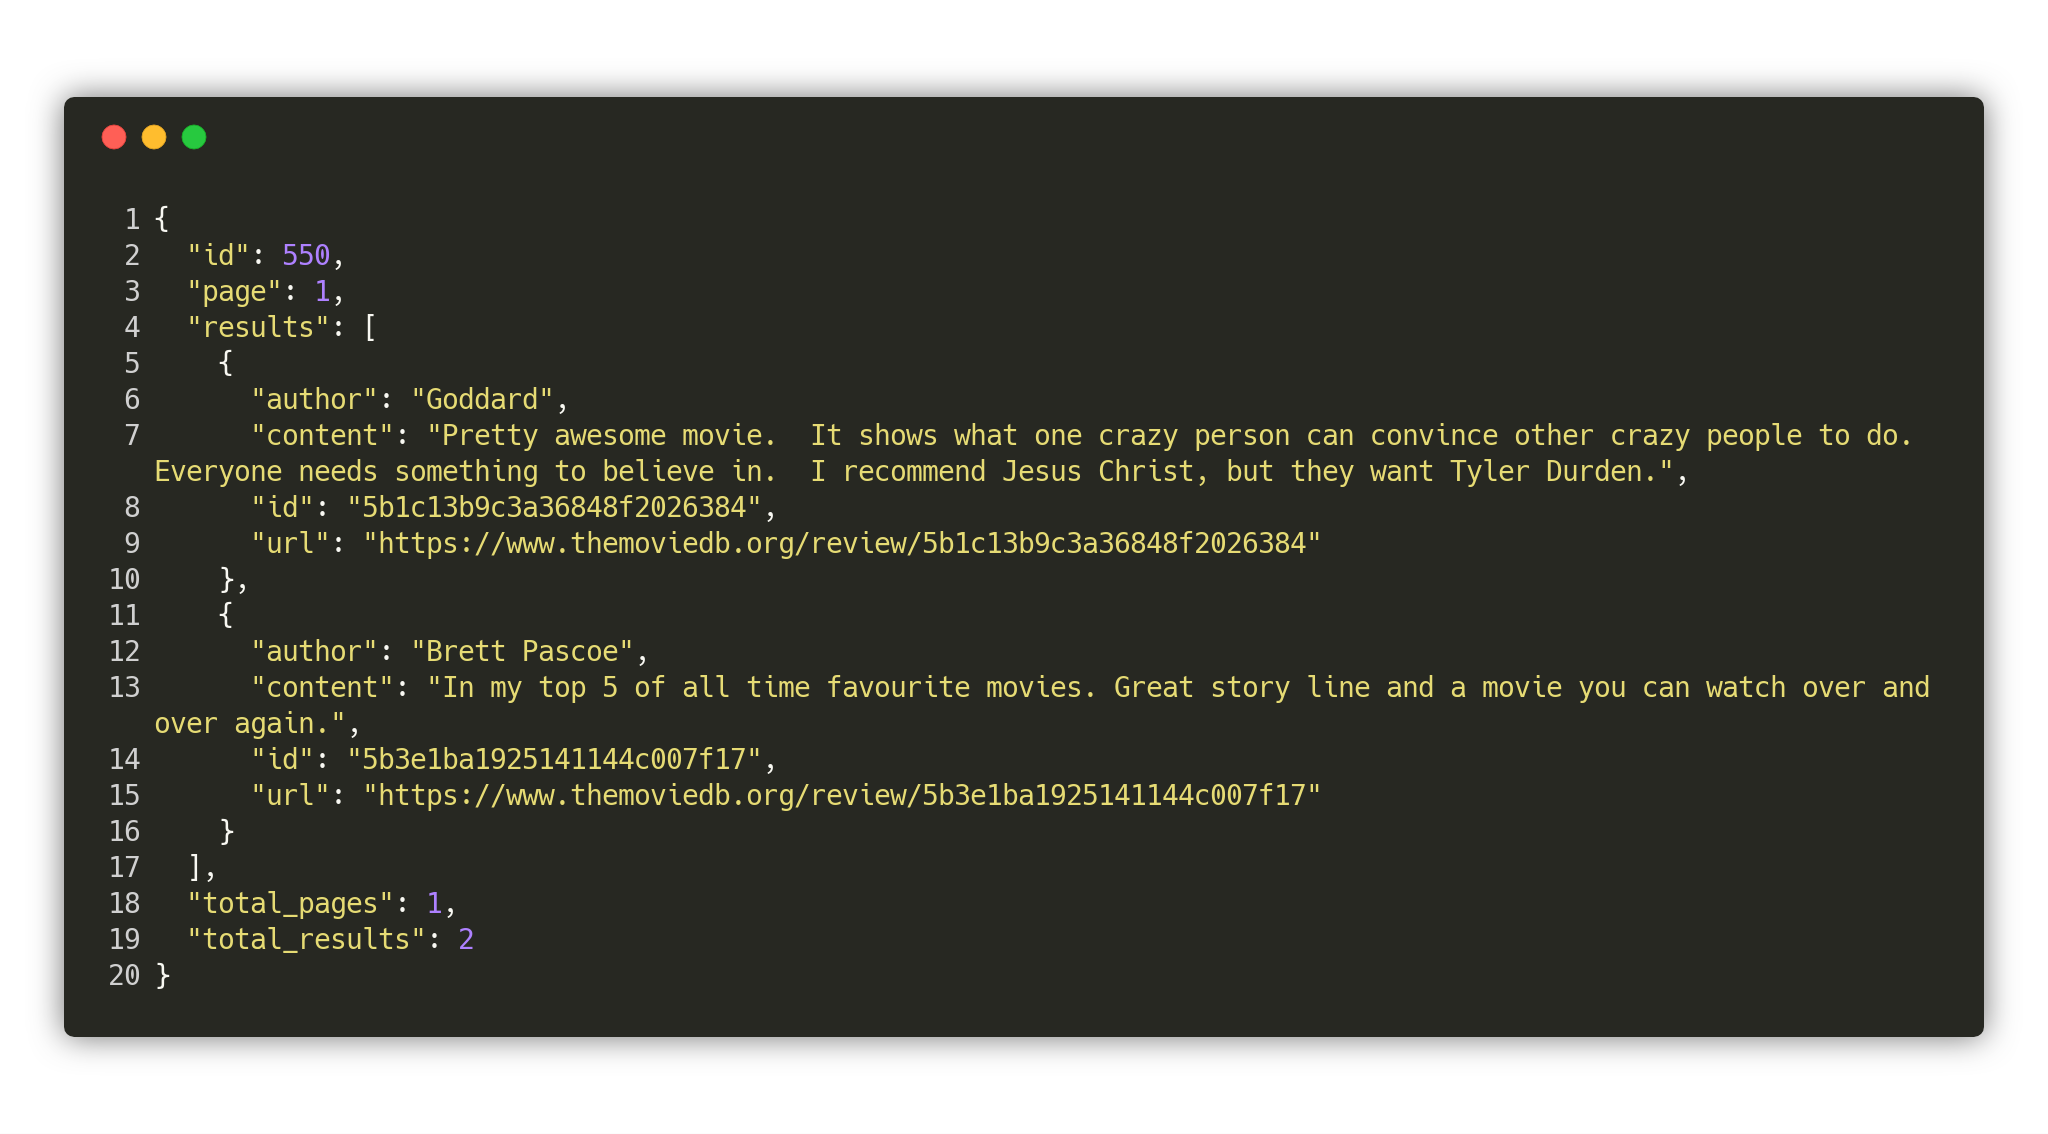
And to get a movie’s reviews, we need aReviewManager. I promise, this will be the last.
ReviewManager uses the TMDB Review endpoint. For example, it’ll hit the URL; https://api.themoviedb.org/3/movie/550/reviews?api_key=1a6eb1225335bbb37278527537d28a5d&language=en-US&page=1 and get the following JSON payload as a response.
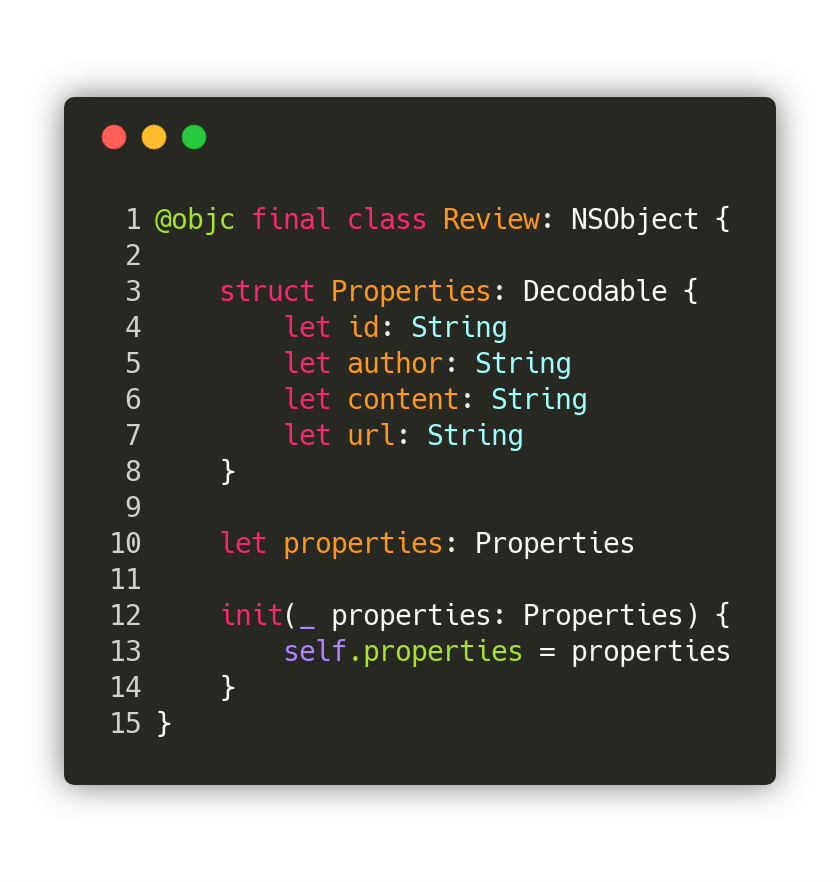
First things first, let’s declare a new model class which we’ll call Review. Since this class needs to be used in ObjC, it needs to be annotated accordingly.
Since these reviews come in pages, we also need to write an ObjC friendly ReviewPage.

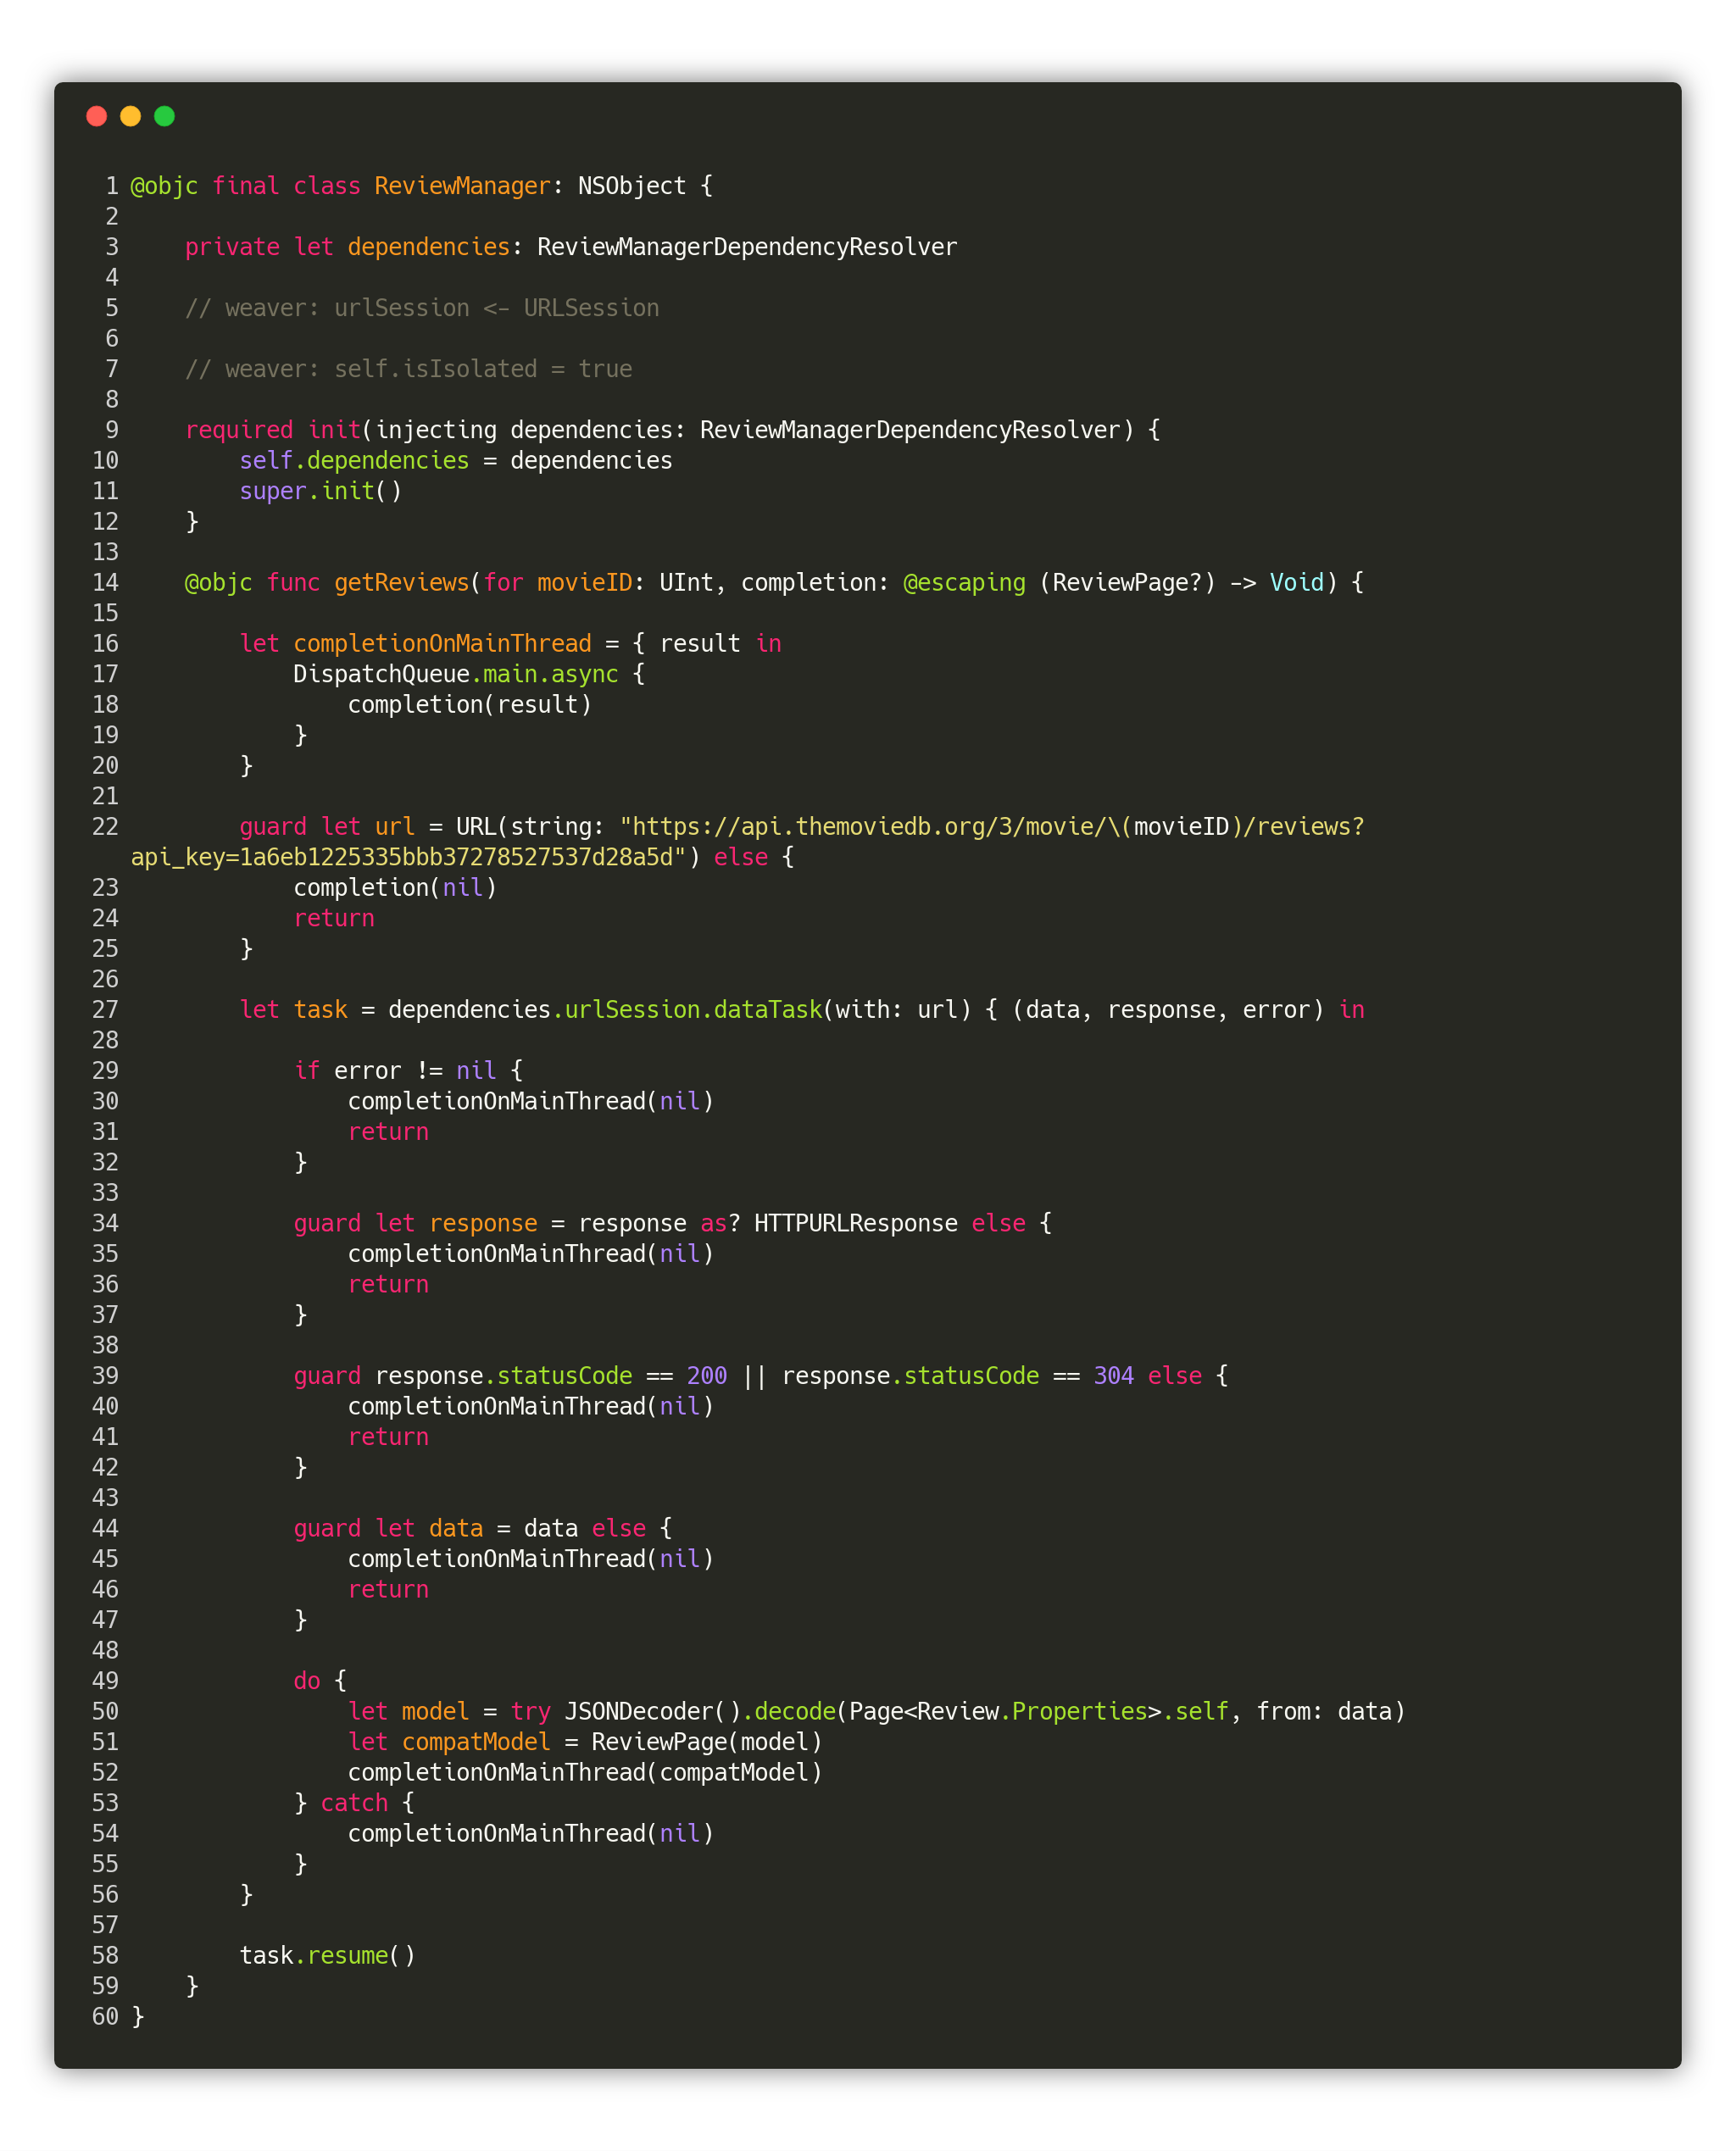
And now let’s write our ObjC friendly ReviewManager:
Note that we reused the same urlSession reference than in MovieManager and ImageManager.
We also used the new annotation // weaver: self.isIsolated = true which tells Weaver that ReviewManager isn’t in the dependency graph yet. As soon as Weaver knows that, it avoids performing dependency resolution checks on ReviewManager. Otherwise, it would fail on the urlSession reference resolution. This is only a temporary solution until ReviewManager can be introduced in the dependency graph.
Finally, we can write WSReviewViewController in ObjC.
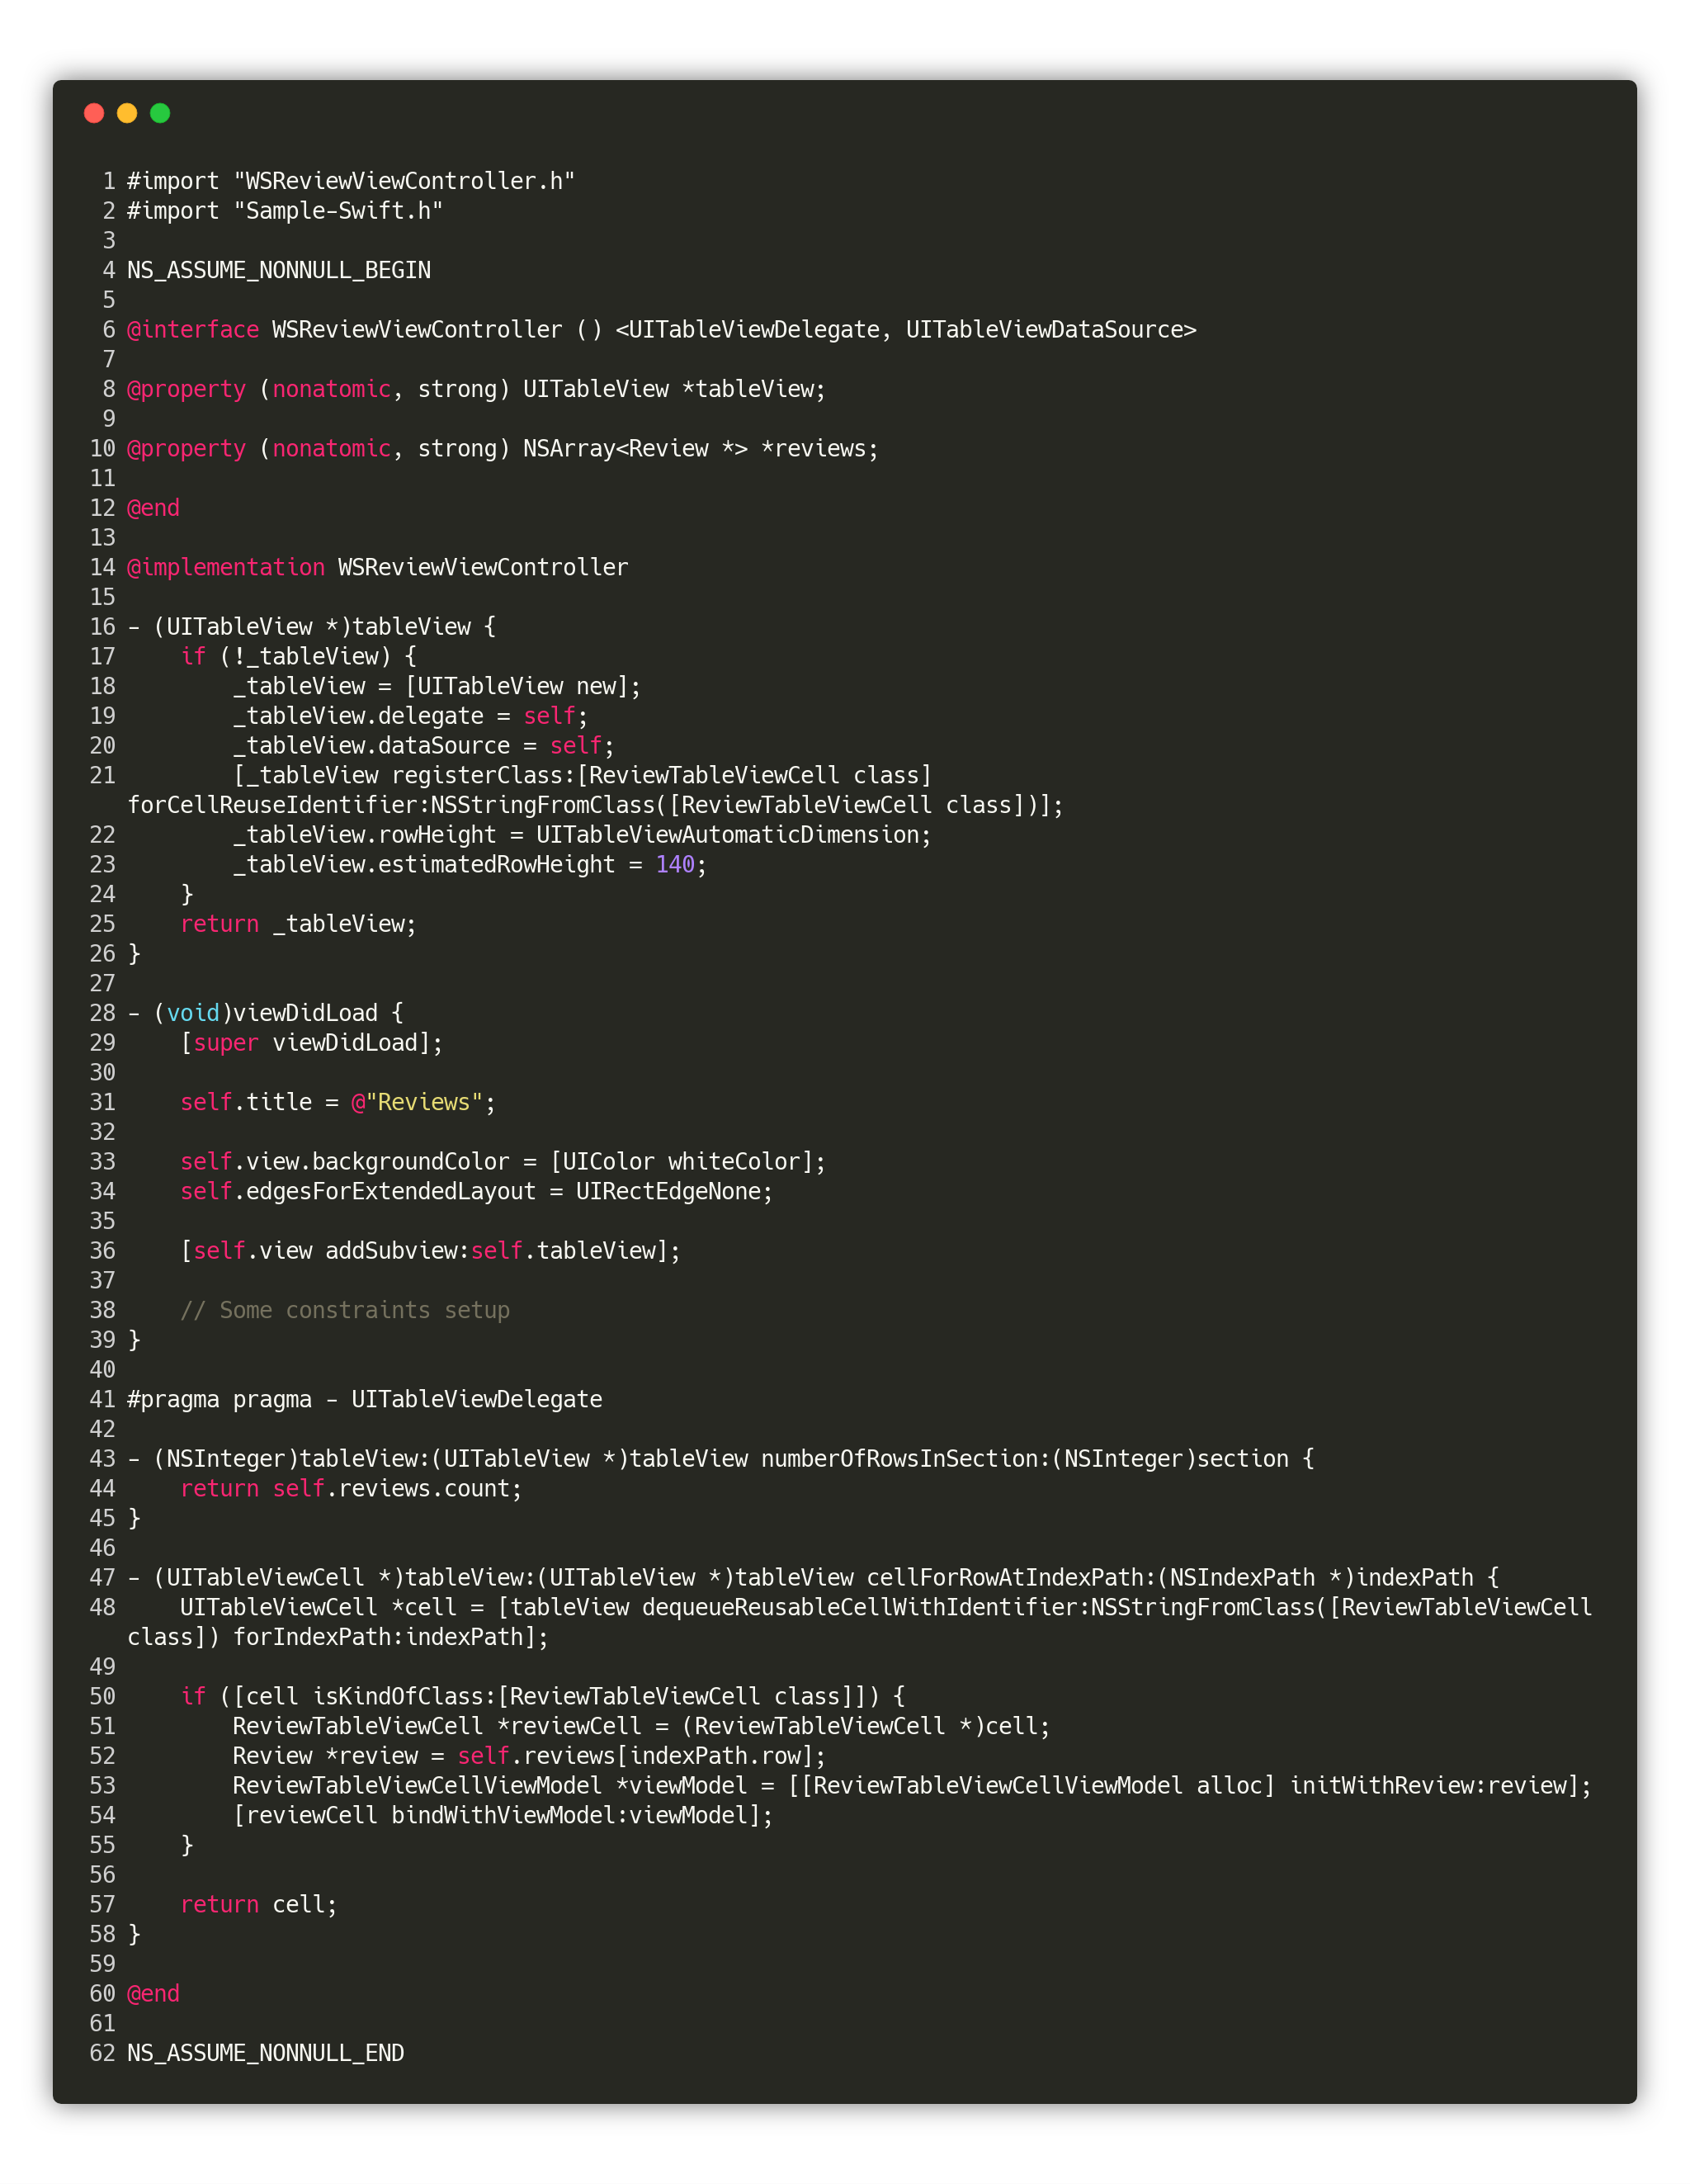 WSReviewViewController.m on Gist & ReviewTableViewCell.swift
For now, there’s no injection and WSReviewController only shows an empty UITableView.
Now we have a problem because Weaver can’t parse ObjC source code, thus, adding annotations to this controller would have no effect. But what we can do is extend WSReviewController in a swift file which Weaver can understand.
 WSReviewViewController+Injectable.swift on Gist
By extending WSReviewViewControllerObjCDependencyInjectable, we tell Weaver to consider this extension as a regular class, making it generate the protocolWSReviewViewControllerDependencyResolver.
All is left to do is write an initializer in WSReviewViewController that takes a id and stores it, then uses it to resolve our ReviewManager.
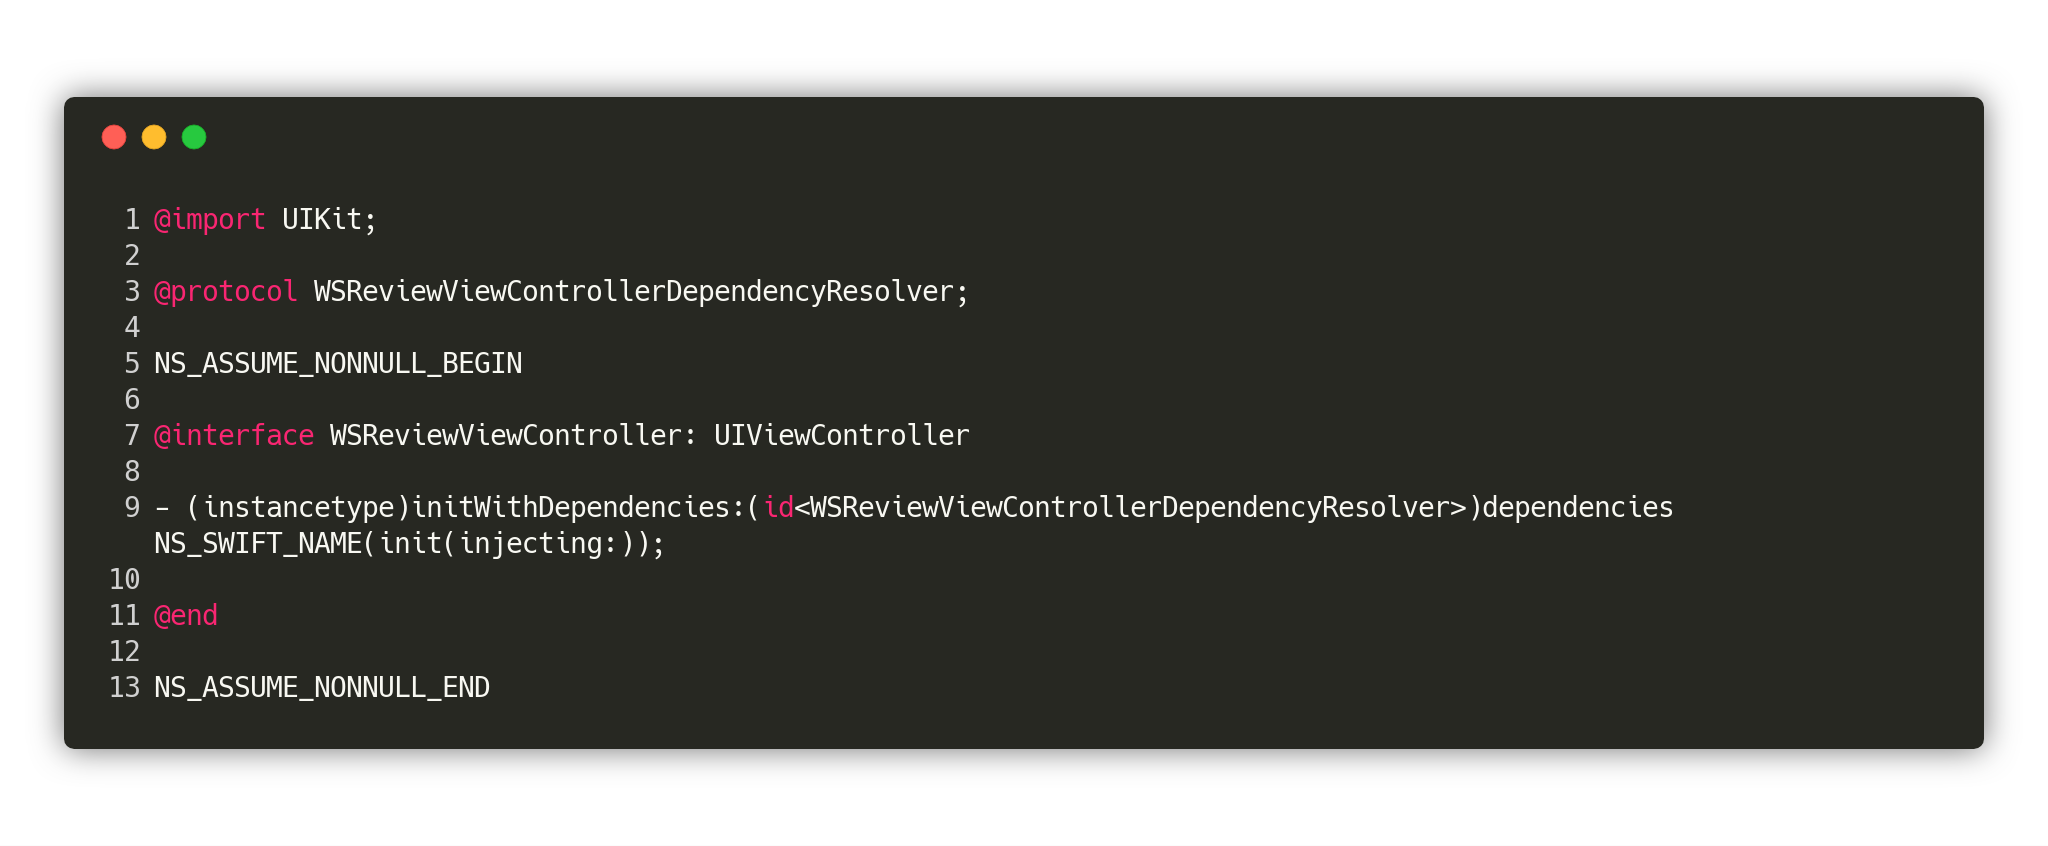 WSReviewViewController.h on Gist
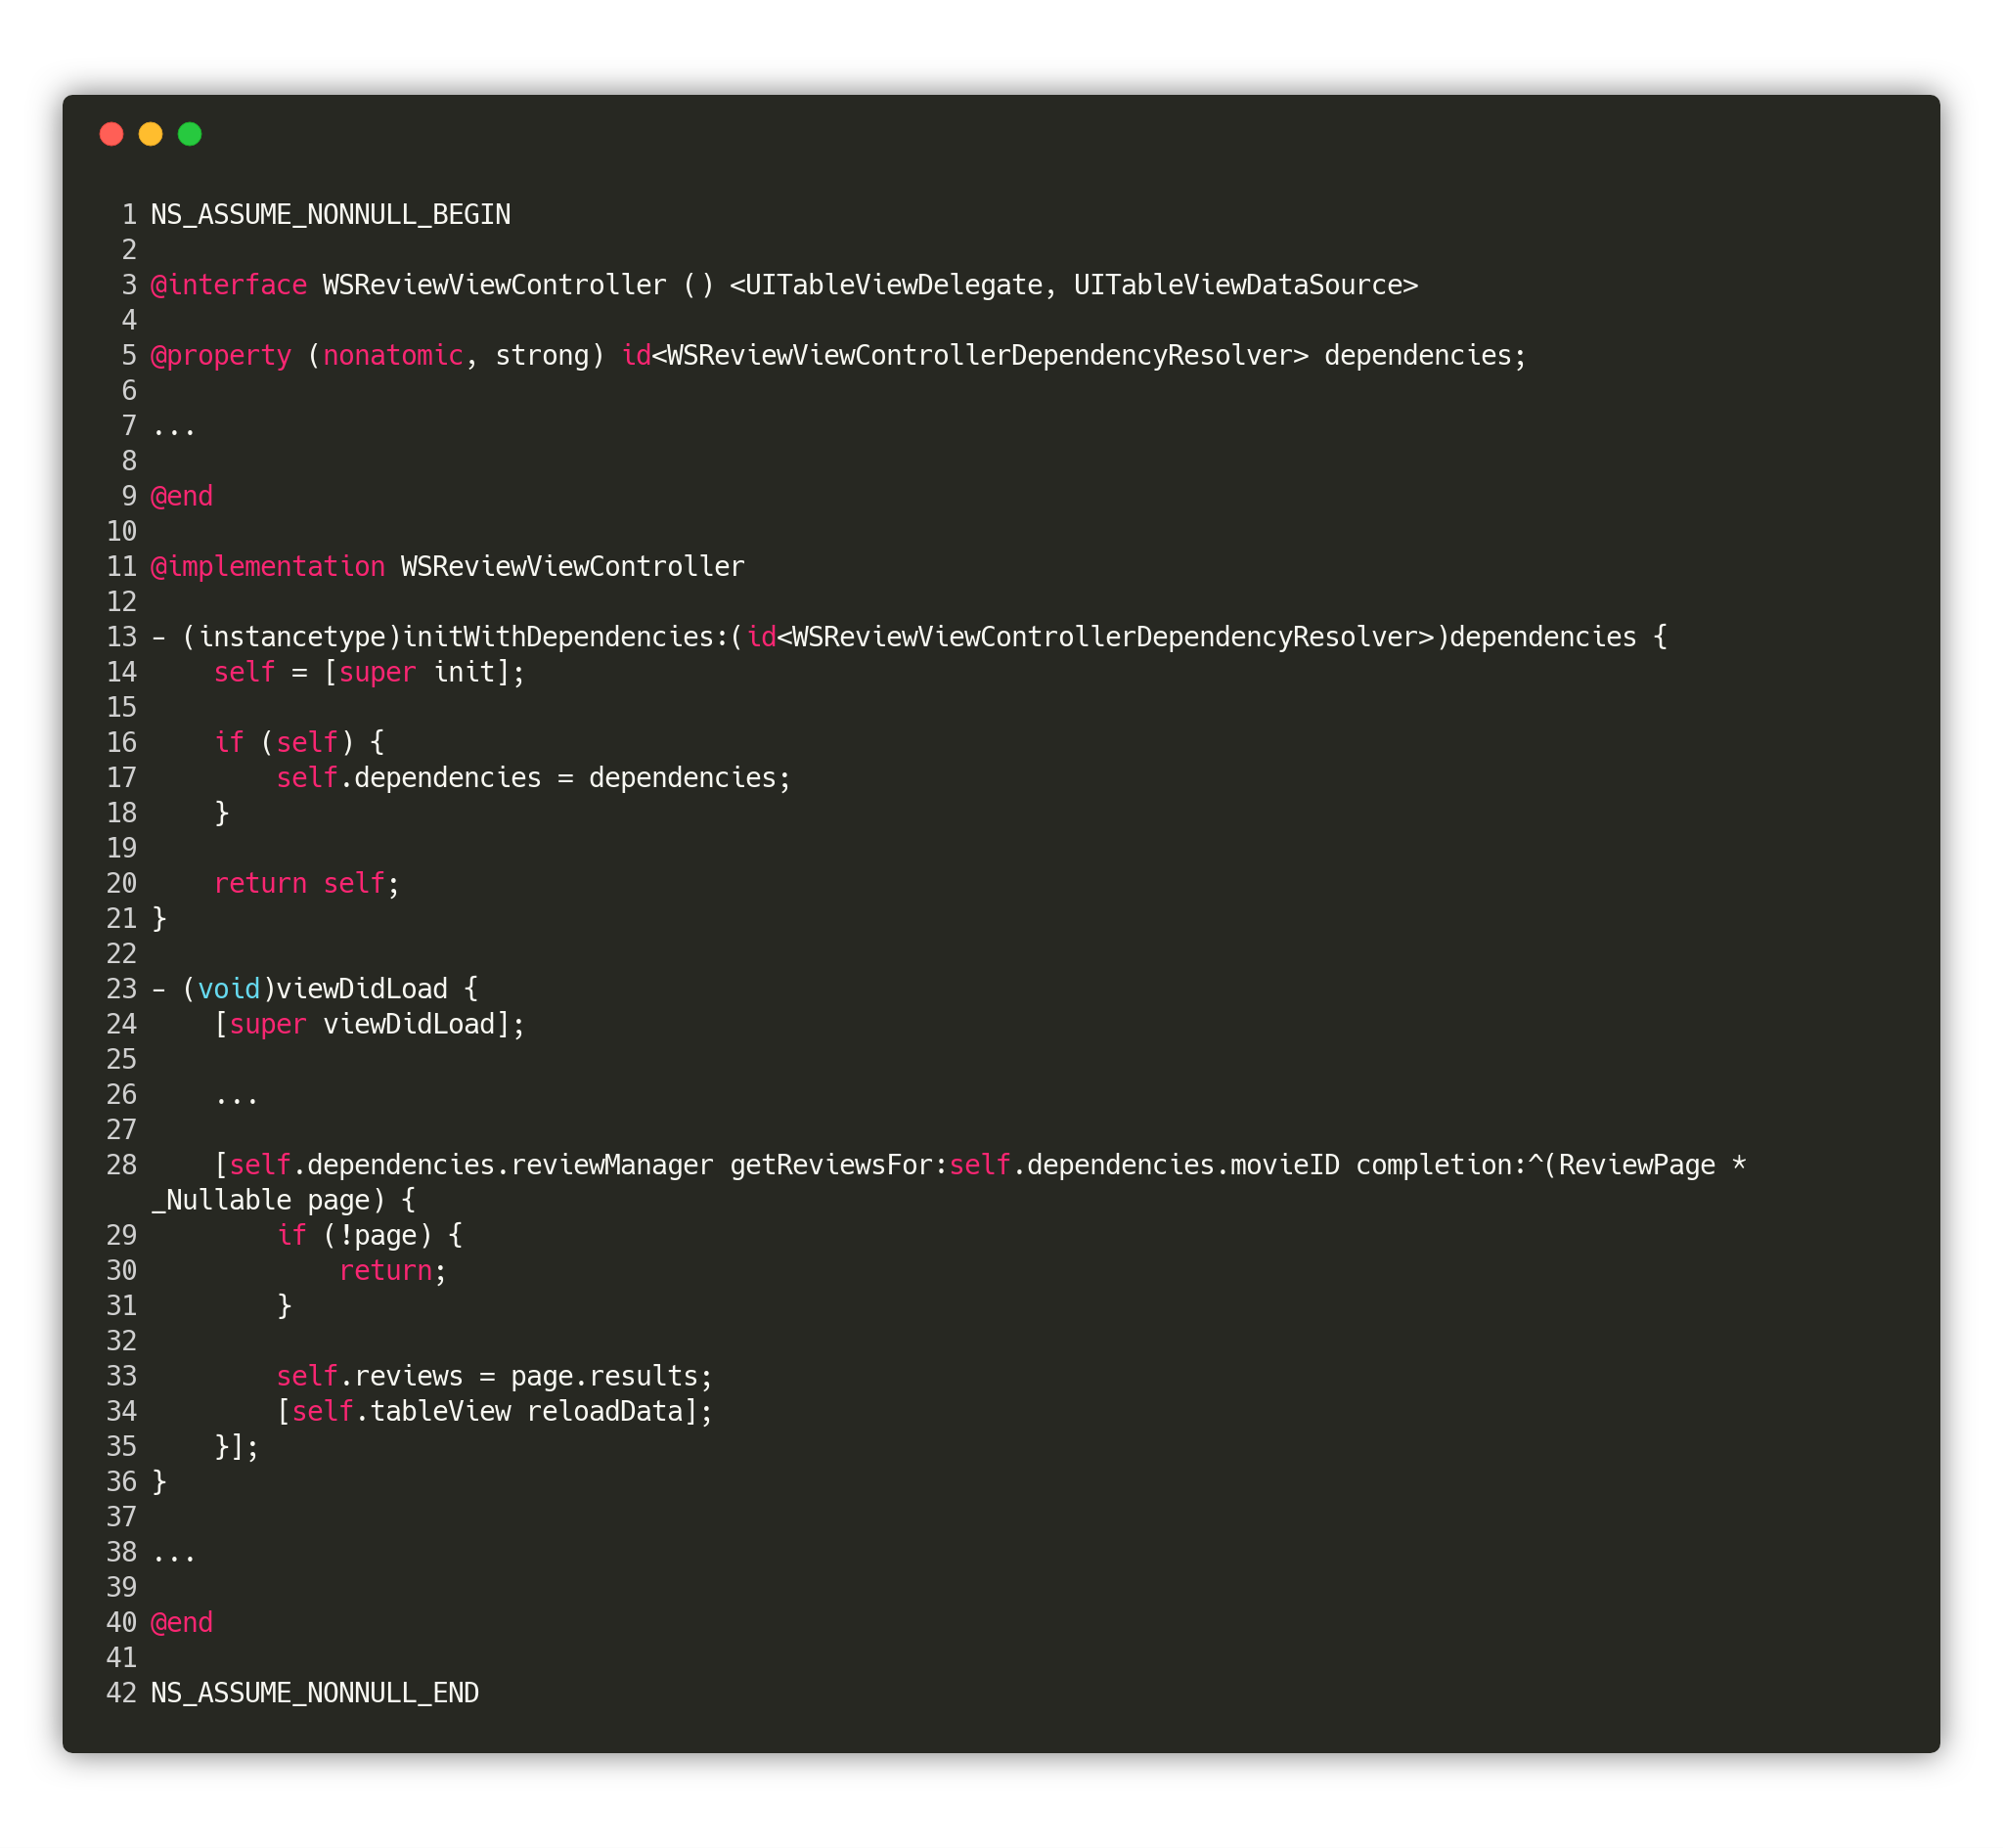 WSReviewViewController.m on Gist
Now we can show WSReviewViewController when a user taps on the MovieViewController movie cover image. Also, since we are registering WSReviewViewController, it is now part of the dependency graph, meaning we have to get rid of the annotation // weaver: self.isIsolated = true in ReviewManager and WSReviewViewController+Injectable.
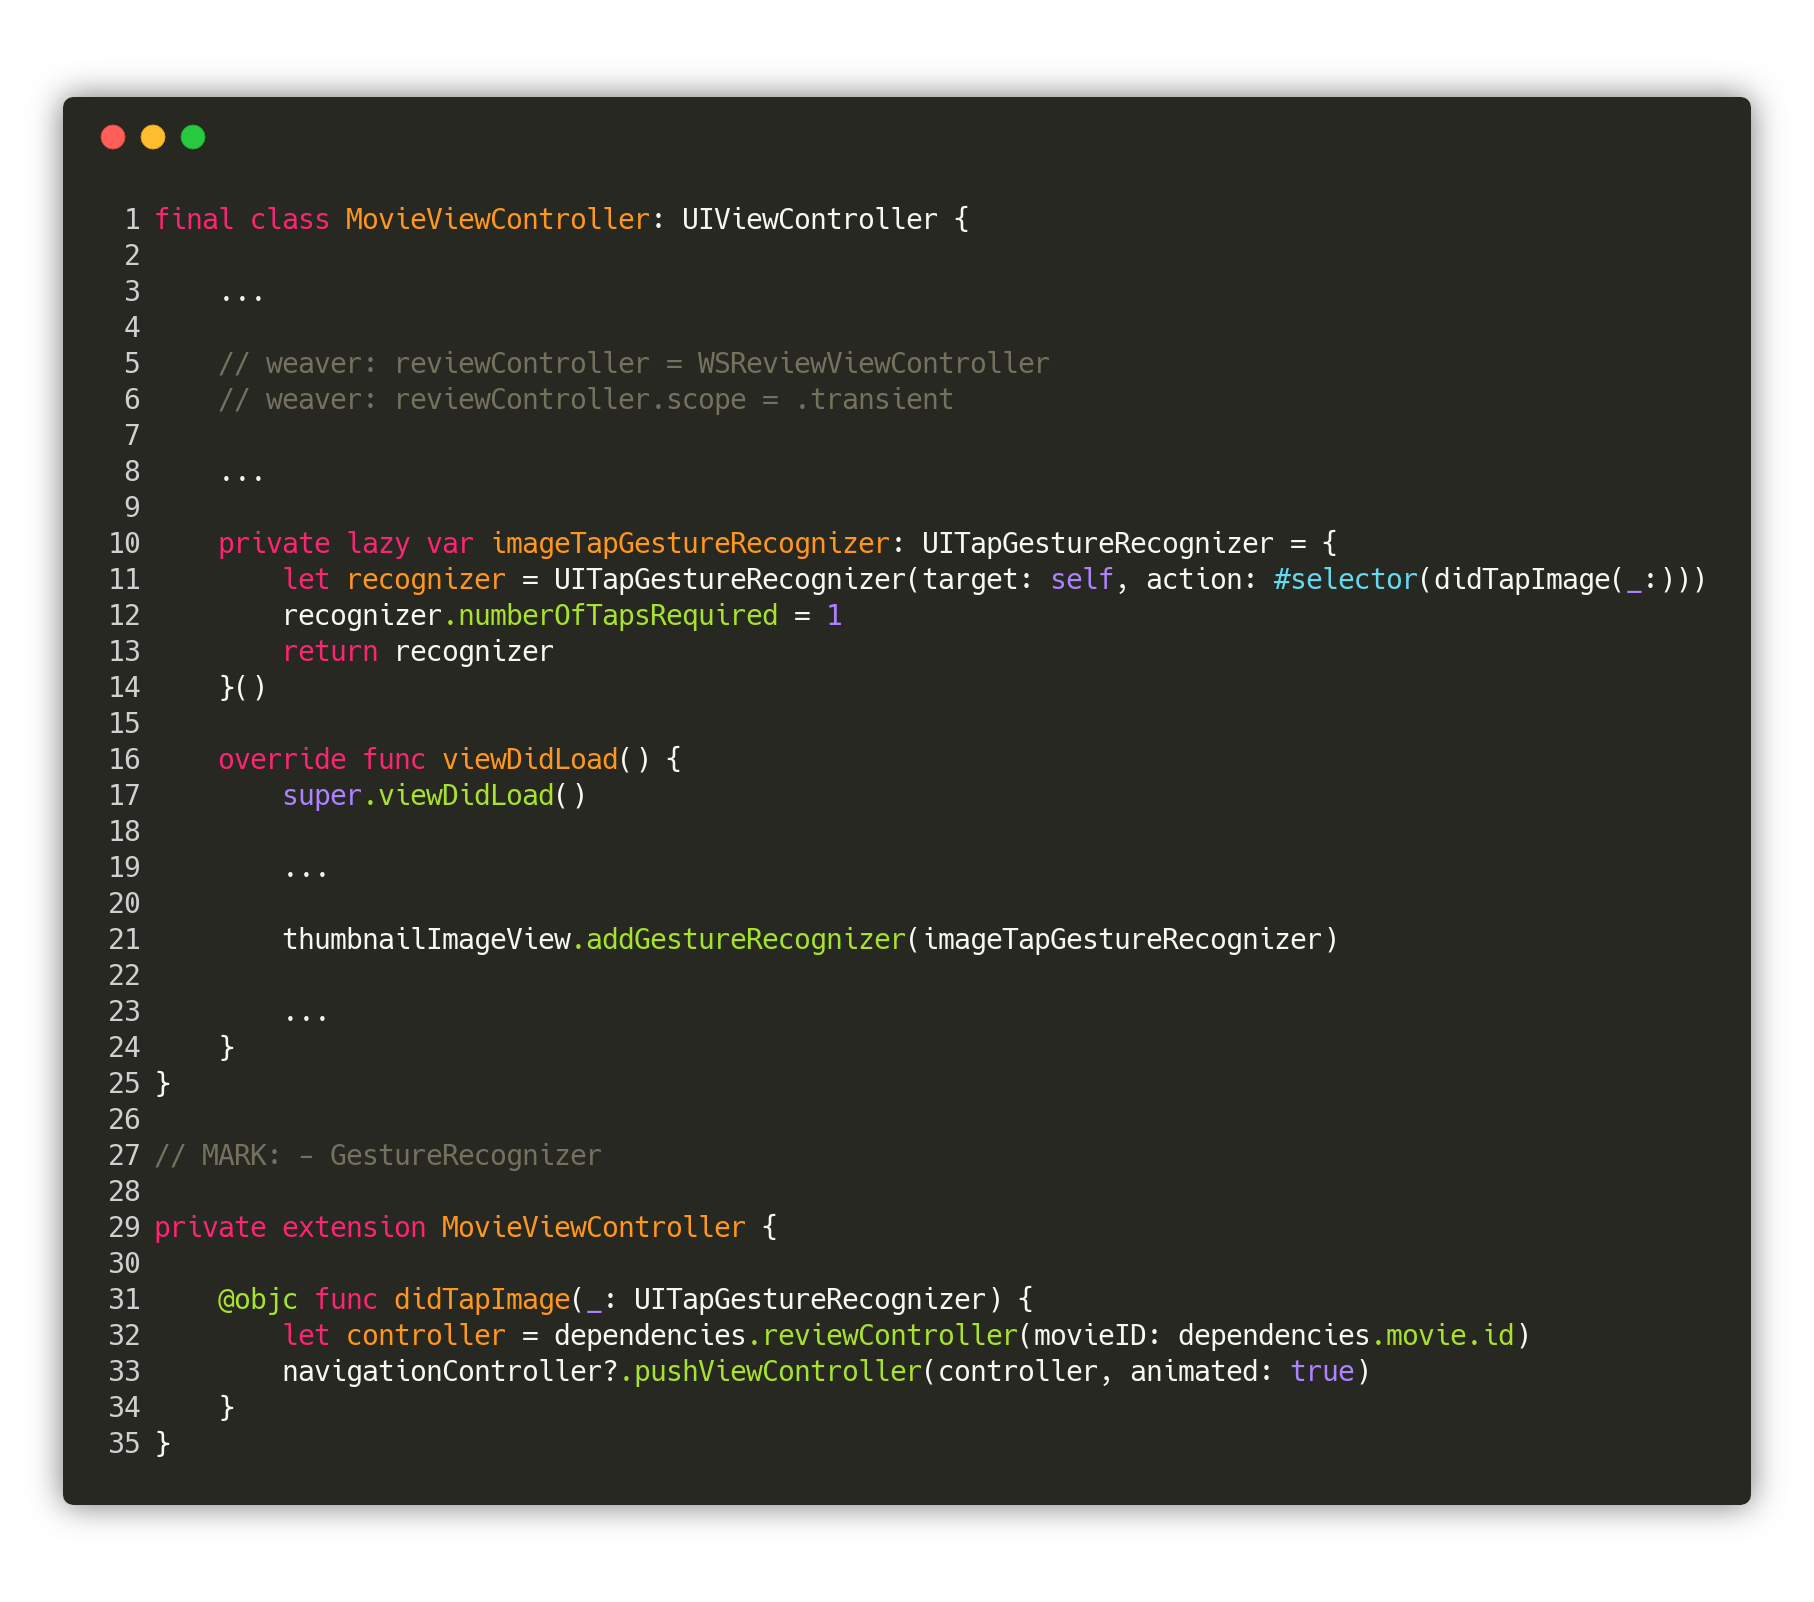 MovieViewController.swift on Gist
Here we registered WSReviewViewController with a transient registration annotation and used it with the DI container’s method func reviewController(movieID:).
Note how the fact that we wrote our controller in ObjC doesn’t impact the way it’s injected. This means that the day you want to rewrite it in Swift you won’t have to rewrite any Weaver annotation in your codebase.
Conclusion
That’s all for the first part of this tutorial in which you learned how to:
-
Write injectable Swift classes
-
Inject a dependency by registration
-
Inject a dependency by reference
-
Inject a dependency as a parameter
-
Use a custom dependency builder
-
Share a dependency throughout the codebase
-
Write injectable ObjC classes
While exploring all of the above, we rewrote a slightly simplified version of the Weaver’s sample app.
In the second part we will see how we can use Weaver to write **clean and flexible unit tests.**
I hope to see you soon, and of course, for any question or suggestion feel free to comment or reach me on Twitter @thrupin.
Thanks for reading!
Cheers
If you want to work on changing how the world reads, come join us! www.scribd.com/careers